Free Shipping and Installation
Only pay a deposit for delivery
4.8/518,571 Reviews!
Only pay a deposit for delivery

Get your custom carport at our factory direct prices with free delivery and installation!

Customize Now, It's Free

Alan’s Carport Buyer’s Guide

Introduction

  • Are you considering adding a carport to your home?
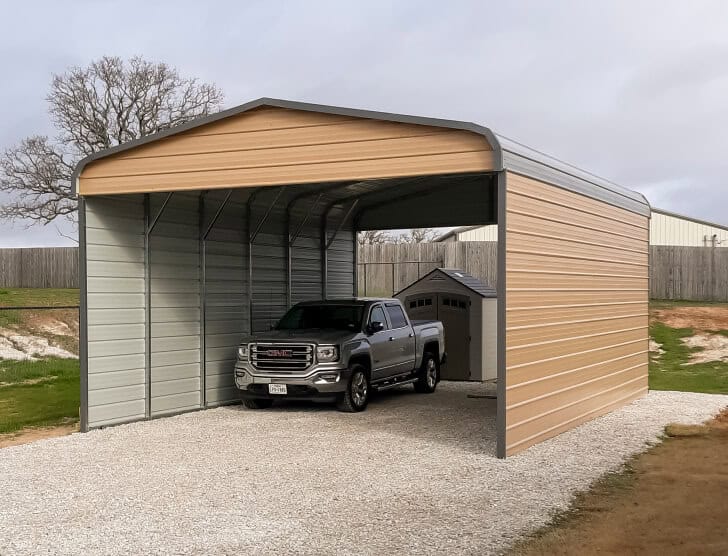
  • Are you wondering which type of carport is right for your specific needs?
  • Do you need to find out how much carports cost in your area?
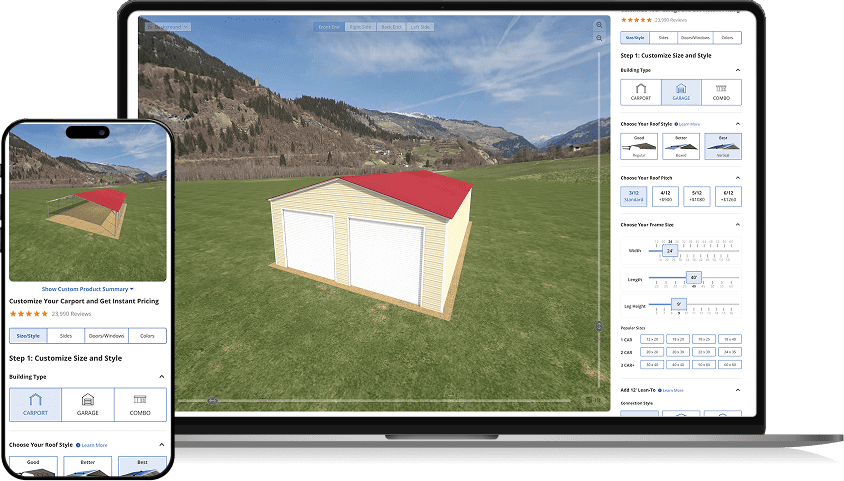
  • Do you want a quick and easy guide to buying a carport?

If you answered “yes” to any of those questions, this guide is for you.

I’m Alan Bernau Jr., owner of Alan’s Factory Outlet. I’ve helped more than 75,000 homeowners customize and install carports, metal garages, and similar metal buildings. That experience has helped me understand what questions homeowners like you have about metal carports.

I created this guide to help you get the answers you need to make the right decision for your situation.

In this guide you will learn:

  • The pros and cons of metal carports.
  • How you can know if a metal carport is right for you.
  • How to calculate what size of carport you need.
  • How much your carport will cost.
  • How to quickly get information about regulations and permits.
  • How to design your carport and get it installed.

Over the past several years, the demand for metal carports has continued to grow rapidly. If you want to save time and money on your carport, you should read this guide now, before prices go up.

If you happen to have any questions that aren’t answered in this guide, just give me a call or contact me through my website and I’ll be glad to help.

Sincerely,

Alan Bernau Jr.

1-800-488-6903


https://alansfactoryoutlet.com/contact-us/

Back to top

Build Your Own Metal Garage or Carport With Our 3D Builder

Build your Own Metal Garage or Carport With Our 3D Builder

Customize Now

Chapter 1

Is a Metal Carport Right for You?

Considering adding a carport to your house? Here’s a quick checklist to help you determine whether a prefabricated metal carport is your best option or not.

A metal carport is right for you if…

  • You have vehicles you want to protect

    A carport will help protect your vehicles from damage caused by the sun’s UV rays, wind, rain, snow, ice, and hail.

  • You have a limited budget

    Prefabricated metal carports are much less expensive than wood or concrete carports.

  • You want a low-maintenance carport

    Steel carports last a long time and require very little maintenance. Insects, dry rot, and fire won’t damage your metal carport.

  • You want to increase the value of your home

    Adding an attractive metal carport to your house can make your property more appealing to potential buyers and add thousands of dollars to the resale value of your home.

  • You don’t want to fuss with a complicated and potentially expensive do-it-yourself project

    Building a carport yourself might seem like it would be cheaper than buying a prefabricated carport. But manufacturers get volume discounts on materials, don’t charge you for left-over materials, and already have all the tools they need to install the carport. As a result, buying a prefabricated carport is often cheaper than building one yourself.

A metal carport is not right for you if…

  • Your budget is under $1,500

    A basic, one-car carport starts at a little under $1,500. A two-car carport starts at a little under $2,000.Car covers are a cheaper way to protect vehicles. However, car covers should only be used for long-term storage of a clean car. Every time you pull a car cover on or off of a dirty car, you risk scratching the car.

  • You need a carport tomorrow

    Regardless of how you go about it, getting a carport will take some time. In many cases you’ll need to get a permit, prepare the site, add gravel or have a concrete slab poured, and then schedule an installation. Metal carport manufacturers have lead times that can run from several weeks to several months. The exact wait time for small carports can be unpredictable.If you need a carport ASAP, one option is to order a carport kit from a home improvement store. You can probably get it delivered in a few days, and set up within a week. However, if you buy a carport from a home improvement store, you will usually:

    • Pay more money for a very basic, plain-looking carport that you can’t customize
    • Get minimal wind and snow load ratings, with no option to upgrade
    • Get a much shorter warranty
    • Have a difficult installation job to do by yourself

    But if you’re in a hurry, perhaps these trade-offs in quality, cost, and convenience make sense.

  • You belong to a homeowners association that doesn’t allow carports

    If your property is subject to HOA rules or other restrictive covenants, you’ll need to check what is allowed in your community before considering a carport.

  • You want an attached carport

    Most prefab metal carports can’t be directly attached to your house. The carport installers will need about three feet of space on every side of the carport in order to set it up. Local building codes may require even more space between your house and your carport.

    If you want an attached carport, you’ll probably want to hire a contractor to design and build a custom carport for your house. This will usually cost at least twice as much as a detached metal carport.

  • You want to protect your vehicles and equipment from theft

    If you’re concerned about mischievous characters that might come around when you’re not home, you need a garage. My Metal Garage Buyer’s Guide will tell you everything you need to know about planning and buying a metal garage. If you need a place to protect and store equipment, a utility carport is a cost-effective option. This type of carport has an enclosed storage shed at the back. If this is what you need, give us a call to find out more.

What did you find? Does a detached metal carport fit your needs? In the next chapter you’ll learn how to size your carport. You will also get an initial estimate of how much your carport will cost.

Back to top

Chapter 2

How to Plan and Size Your Carport

Now it’s time to figure out what size of carport you need and approximately how much it will cost. The following chart will help you get a rough idea of what size of carport is right for you.

SizeDimensions (ft)Carport Cost
Small one-car carport12×20$1,400+
RV carport18×35$3,100+
Small two-car carport20×20$1,900+
Large two-car carport24×25$2,800+
Three-car carport30×25$4,200+
Four-car carport24×40$5,700+

Planning a Custom Carport

To calculate the exact dimensions that are ideal for your situation, sketch a floor plan. This sketch will give you a better idea of how your vehicles will fit under your carport.

Example Sketch

Step 1 – Measure Your Vehicles

Here are three easy ways to measure your vehicles:

  1. Use a tape measure (this is easiest with two people), or
  2. Estimate by stretching out both arms next to your car (the length between the tips of your fingers is about the same as your height), or
  3. Use the vehicle size chart below
Vehicle TypeWidth*LengthHeight
Sports Car5 ½-6 ½ feet13-16 feet4-4 ½ feet
Compact Car6 feet14-15 feet5 feet
Mid-Size Car6 feet15-16 feet5 feet
Full-Size Car6 feet16-17 feet5 feet
Minivan or SUV6 ½ feet16-17 feet5 ½-6 ½ feet
Full-Size Truck6 ½ feet17-22 feet6 ½ feet
Class A RV8 ½ feet29-45 feet12-14 ½ feet
Class B Camper Van8 feet17-23 feet9-11 feet
Class C RV8-8 ½ feet21-41 feet10-12 feet

* Widths do not include the width of rear-view mirrors.

Step 2 – Calculate Your Carport Width

Two-Car Carport

To calculate the ideal width for your carport, start with the widths of your vehicles. Then add at least two feet of space between the sides of the carport and your vehicles.

If you plan to add panels on the sides of your carport, leave at least three feet of space between your vehicle and each side of the carport.

You will also want at least three feet of space between each vehicle. This will give you enough space to open your vehicle doors.

Finally, add 2 ½ inches to each side to account for the width of the frame.

Example: 2 ½” frame + 3’ space + 6’ 6” truck + 3’ space + 6’ car + 3’ space + 2 ½” frame = 21’ 11” wide

Step 3 – Calculate Your Carport Depth

In order for your carport to protect your vehicles, it should be several feet longer than your longest vehicle. The roof extends an extra six inches beyond the front and back of the frame. You will want an additional two or three feet in front of and behind your longest vehicle.

Example depth calculation: 3’ space + 19’ long truck + 3’ space = 24’ deep

In the next chapter I’ll show you how to use an online carport designer to design and price your carport.

Back to top

Build Your Own Metal Garage or Carport With Our 3D Builder

Build your Own Metal Garage or Carport With Our 3D Builder

Customize Now

Chapter 3

Design and Price Your Carport

Now you are ready for the fun part: creating a 3D design of your new carport!

I have created a free 3D carport designer tool to make this part easy. If you have a computer, you’ll want to use it for creating your design. The designer will work fine on your smartphone too—but it is easier to use on a large screen.

Step 1A – Open the 3D Metal Carport Builder

On your computer, go to:

https://alansfactoryoutlet.com/3d-carport-and-metal-garage-builder/

Step 1B – Choose Your Roof Style

The regular roof style is the least expensive option. If your budget is tight, this is a good choice.

The boxed-eave style looks nicer than the regular style.

The vertical style has these advantages:

  • It is stronger than the other roof styles
  • It allows rain to run off immediately and makes it easier for snow to slide off
  • It works for carports more than 30 feet wide and more than 35 feet long

Step 1C – Select Your Dimensions

Now, select the width and height of your carport. Use the measurements you calculated in chapter 2 of this guide.

Note: If you need custom dimensions that aren’t available in the designer, just use the next larger available size. We can match your custom dimensions, but the cost will be the same as the next larger, standard size.

Step 1D – Height

I recommend making the legs of your carport at least one foot taller than the tallest vehicle you plan to own. Remember to include roll bars, top racks, and RV AC units in your height measurements.

Note: If you close the gables of your carport, the clearance will be about three inches less than the leg height. For example, if your carport’s legs are 7’, the clearance will be about 6’ 9”.

If you leave the gables open, the maximum clearance will be at the center brace, near the peak of the roof. This is a little more than two feet higher than the leg height. From the top brace, the roof frame tapers down to about the height of the legs at each side. So if you have a carport with 7’ legs, you can park a vehicle under it that is a little taller than 7’, as long as you don’t park too close to either side.

Carport Clearance

Don’t make your carport too tall. If your carport is too tall, it won’t protect your vehicles from the sun, rain, hail, and snow. About one foot higher than your tallest vehicle is ideal.

Step 1E – Other Options

Installation Surface: We’ll cover this in the next part of the guide. For now, select any option.

Certification/Tubing: If you live in an area with hurricanes, strong windstorms, or lots of snow, you may want to select the heavier, 12 gauge tubing and upgrade your certification (if available).

Step 2 – Sides and Gables

If you want extra weather protection, add side panels. If you add side panels, I recommend also adding J-trim to protect children, pets, and your fingers from the sharp bottom edge of the steel side panels.

If you want your carport to have a nicer appearance, consider adding closed gables. Adding gables also makes your carport stronger and provides additional weather protection. Remember that the clearance below the gables will be about three inches less than the leg height.

Step 3 – Doors and Windows

If you can afford to fully enclose your carport it will become a garage. For tips on designing a garage, see my Garage Buyer’s Guide.

If you don’t want a garage, skip this step.

Step 4 – Colors

The colors you choose won’t affect your price, so this is a matter of preference. Many people like white trim. Others match the color of the trim to the color of the roof.

Step 5 – Save Your Design

Now that you have finished your design, be sure to save it. Find the button that says “Share” or “Save,” click it, and enter your email address to get a link to the design.

Also note the price of your design. If you’re satisfied with your design and want to lock in your price, you can pay a deposit to hold the order, even if you aren’t ready to proceed. My company guarantees a 100% refund of your deposit if you cancel for any reason, so you can order now to lock in your price, and let us know when you are ready to proceed.

In the next chapter I’ll tell you how to find your local planning department and I’ll give you a list of everything you need to ask about local rules and regulations.

Back to top

Chapter 4

What You Need to Know About Regulations and Permits

Many local governments require a permit to install a carport. Here is how to find out what is required in your area.

Step 1 – Check CC&Rs

Does your local community allow carports?

If you live in a rural area, you are usually free to build what you want on your own land. But if you live in a subdivision, there may be Covenants, Conditions, and Restrictions (CC&Rs) that limit what you can build on your land.

If you are part of a Homeowners Association (HOA), ask if they allow detached metal carports.

If you don’t belong to an HOA, but you are in a subdivision, look through that stack of papers you signed when you bought your house. If there are CC&Rs that say anything about detached buildings, read those rules.

Step 2 – Check Government Regulations

Your local planning department can tell you the zoning rules for your property.

You might be able to find all the rules online by yourself—but it could take several hours to find and read through all of the complicated zoning and building codes.

It is much faster to call the planning department and ask the specific questions that I’ll give to you below.

Before you call, you should have this information ready:

  • Your address
  • The length and width of your future carport
  • An idea for where you want to put your carport on your property

Next, you need to find the right phone number to call.

  • If you live in a town or city, do an internet search for your town or city’s planning department.
  • If you live outside of a town, search for the county’s planning department.

Your local planning department may be called a:

  • Land Use and Development Office,
  • Zoning Department,
  • Building and Planning Division,

or something similar.

For example, I did a search for “Page County VA planning department,” and I found results for a “Planning Commission,” “Planning & Community Development,” and a “Zoning Office.” The phone number was the same for all of them. Even if you call the wrong number, the person who answers the phone will probably be able to give you the right number to call.

List of Questions to Ask (Be Sure to Take Notes!)

  1. Is my property in your jurisdiction?
  2. How far does the carport need to be from the front, back, and sides of the property?
  3. How far away does the carport need to be from the house?
  4. (If you plan to put it in front of your house) Can I put it in front of my house?
  5. (If you have a well or septic tank) How far does the carport need to be from the well and septic areas?
  6. (If you are building a tall carport) Is there a height limit?
  7. Are there any color or style restrictions for detached carports?
  8. What permits and inspections are required for installing a carport?
  9. What department issues permits? (If it is a different department, ask for the phone number)

If a permit is required, here are the questions to ask the department that issues building permits:

  1. How long does it take to get a permit?
  2. Are certified plans required for the permit?
  3. What are the requirements for the foundation?
  4. Are there any wind gust or snow load certification requirements?
  5. How much does the permit cost?
  6. Is there an online application?

Make sure to write down all the information you learn. There are a few more steps you’ll need to complete before you’ll be ready to apply for a permit. In the next chapter I’ll show you how to use the information you have gathered to plan your site.

Back to top

Build Your Own Metal Garage or Carport With Our 3D Builder

Build your Own Metal Garage or Carport With Our 3D Builder

Customize Now

Chapter 5

Planning Your Carport Site

In the last step, you found out how close your carport can be to other structures and your property boundaries. Now it is time to make a site plan. Grab a tape measure and head outside to the spot you want to put your carport.

Step 1 – Find a Level Spot

The area where you will install your carport must be level. Level isn’t the same as flat. Level means the ground doesn’t slope.

Find a location that is already mostly level, or find an area that you can make level. You will also need at least three feet of fairly level ground all around the carport, where the installation crew can place their ladders.

If you need to grade your land to make it level, consider also grading the land around your carport so that it slopes slightly away from the building. A slight slope helps ensure that water flows away from the carport.

Step 2 – Look Overhead

Utility lines near the area you want the carport can be a safety hazard when installing a carport. Find a location that doesn’t have any utility lines overhead or within 20 feet of the site. If you want to put your carport anywhere near overhead lines, please give me a call to discuss your site before continuing.

Are there any trees near the place you want to put your carport? Trim limbs that might interfere with installation or that could fall on your carport. The peak of an average-size carport will be about three or four feet higher than the height of the legs. Make sure there is plenty of clearance for installation.

Step 3 – Mark Your Corners and Check Setbacks

Now you can mark the four corners of your carport with stakes, sticks, or flags.

Make sure your carport site is far enough away from property lines, your house, outbuildings, your well, and your septic field. Measure any distances you aren’t sure of to confirm that your site complies with zoning regulations.

Be especially careful about setbacks from property lines. Often fences are not right on the property line. You may need to leave an extra foot of space from a fence to be safe. If you want to put your carport near a road, double-check where the property line is. Often the public right-of-way is much wider than the road. Your property line might be 10 feet or more back from the road or sidewalk. Your local planning department can tell you how wide the right-of-way is.

Step 4 – Check Underground

If you have any easements on your property, you may not be allowed to build a carport above those areas.

If you’ll be doing any grading or excavation, check what is underground before you dig. Anywhere in the US you can call 811 or visit call811.com to request all underground utilities around the site to be marked.

If there are any utilities near your building site, you may need to move your site to a different location.

Back to top

Chapter 6

Planning and Pricing Your Foundation

You have several options for your carport foundation:

  • Existing driveway
  • Ground
  • Gravel pad
  • Concrete slab
  • Asphalt

In this chapter I’ll explain the pros and cons of each option. I will also explain the requirements for each type of foundation.

Existing Driveway

There are two ways we can install your carport over an existing driveway.

  1. If your carport is wider than your driveway, we can attach the frame of your carport to the ground beside your driveway with rebar anchors or mobile home anchors.
  2. If your concrete driveway is at least one foot wider and one foot longer than your carport, we can attach the carport frame to your driveway with concrete anchor bolts. Just make sure the driveway is level. The carport can’t be installed correctly if any corner of the carport site is more than three inches higher than any other corner.

Ground

Your carport can be installed on the ground if your local building department allows it. The installers will anchor the carport to the ground with mobile home anchors.

A dirt foundation is suitable for storing farm and garden equipment. If you want to keep your vehicles clean, a gravel foundation is better.

Gravel Pad

A gravel pad is the most popular and cost-effective base for a metal carport.

How big should a gravel carport pad be?

I recommend making the gravel pad at least two feet wider and two feet longer than the carport. This way you’ll have a little room to walk around the carport.

A slightly wider pad will ensure that rainwater that runs off your carport will fall on gravel. Otherwise, muddy water might splash into your carport.

How deep should gravel be for a carport?

I recommend that you put down at least four inches of gravel. Six inches is better.

What kind of gravel should I use for a parking pad?

The best gravel for a carport is 3/4” stones mixed with smaller stones. The smaller stones help the gravel compact into a solid surface that is almost like concrete.

This type of gravel is called by many different names, like:

  • 3/4” Crusher Run
  • 3/4” Crushed Stone
  • 57 Crusher and Run
  • #57 Aggregate
  • ABC Stone

How do I prepare a gravel carport pad?

  1. Remove the topsoil
  2. Level the site as much as possible
  3. Put down woven geotextile fabric (optional)
  4. Put down at least four inches of crusher run
  5. Use a compactor or a tamper to compact the gravel
  6. Verify that the gravel is level

How can I prevent water from pooling under my gravel pad?

The ground around your carport should slope slightly away from your carport so that water will not pool under your carport. Ideally, the ground 10 feet away from your carport will be at least six inches lower than your carport area.

If you have a problem with mud in your driveway or your carport area, put down woven geotextile fabric before you put down gravel. The fabric will prevent the gravel from sinking into and mixing with the mud.

How much does a gravel carport pad cost?

The gravel for a 22’ x 22’ gravel pad will probably cost between $250 and $500, including delivery.

The cost to hire someone to excavate the site and do all the work for you will depend on the cost of labor in your area.

Do a quick search for ”gravel for sale near me,” and take a moment to call and get a quote for your gravel. If you need excavation, call one or two excavating contractors to schedule a time they can look at your site and give you a quote.

Concrete Slab

A concrete slab is the best foundation for a carport, but if you have a slab installed by a professional, it will probably cost more than your carport!

You can save a lot of money by pouring the slab yourself. In my Garage Buyer’s Guide I explain how to price and plan a concrete foundation and how to cure a concrete slab. I encourage you to read those chapters if you are considering a concrete foundation for your carport.

Asphalt

Asphalt is a cheaper alternative to concrete, but it isn’t the best choice for most people.

Asphalt Pros

  • Up to fifty percent cheaper than concrete
  • Works well in cold areas where the ground freezes and salt is used to melt ice and snow
  • Grease stains blend in

Asphalt Cons

  • Soft – deforms under heavy loads and softens in extreme heat
  • Higher maintenance – needs to be re-sealed every few years
  • Doesn’t last as long as concrete
  • Doesn’t look as nice as concrete

If you live in a cold area with lots of snow and you frequently salt your driveway, asphalt may be a good choice. Gravel or concrete will make a better base for most carports.

Back to top

Build Your Own Metal Garage or Carport With Our 3D Builder

Build your Own Metal Garage or Carport With Our 3D Builder

Customize Now

Chapter 7

Get Financing and Submit Your Order

By now, you have a pretty good idea about how much your carport project will cost.

If you’ve got the cash you need to pay for everything, you just need to order your carport to get started. You only need to pay a deposit when you order, which is usually between 10% and 17% of the total. The balance isn’t due until after the carport is installed. You can pay both amounts with any major credit card.

If you need a way to finance your carport, here are some options:

A zero-interest credit card is a simple, low-cost way to finance a carport. Some cards don’t charge interest for up to 21 months. Be sure to check the terms carefully, and make sure that your credit limit will be large enough to cover the necessary expenses.

If this sounds like a good option, just do a web search for “21-month no interest cards” to see what you might qualify for.

If you need more than two years to pay for your carport, consider a personal loan. Many banks, credit unions, and peer-to-peer lending sites offer personal loans for one-time purchases.

Submit Your Order

Once you have a financing plan, you’re ready to order. If you saved your design, find the email with the link to your design, and open your design in the online designer.

If you can’t find the design you saved, or you want to start over again, just head over to the 3D Carport Builder on my website.

Once you have everything the way you want it, submit your order and pay the deposit to lock in your price. Remember that when you place an order with Alan’s Factory Outlet, you can cancel for any reason and get your full deposit back.

After you submit your order, my team will send you information about requesting a permit and getting your site ready for installation. Then we will hold your order until you get a permit (if required in your area) and your site is ready. Once you have everything ready, we’ll notify the manufacturer, and your order will be put in a queue for scheduling.

If you need to make customizations to your design that aren’t possible with the 3D Carport Builder, just give me a call at 1-800-488-6903.

Ready? Place your order now.

Back to top

Chapter 8

How to Prepare for Your Carport

After you have ordered your carport, it’s time to get everything ready so the carport can be installed.

Step 1 – Get a Permit (If Required)

If a building permit is required in your area, now is the time to apply for a permit.

A few local governments require the manufacturer to apply for (or pick up) a building permit. If this is the case in your area, please let us know.

Engineer Plans. If the building department requires a set of generic engineer plans to review, let us know ASAP. We will get the plans ordered, and the manufacturer will send them to you by email in 1-2 weeks. If your local government requires “wet seal” plans (a set of plans that have been physically stamped with a rubber seal), let us know so we can get them mailed to you.

Site Plan. If the building department requires a site plan, draw a sketch of your property. Show the boundaries of your property, the location of your carport, and the location of other buildings, wells, and septic fields on your property.

Complete the application. Finish filling out the application and pay the fee.

Send us a copy or photo. Once you get the permit, send us a copy, so we’ll know you’ve completed this step.

Step 2 – Prepare Your Site

If your carport will be installed on the ground or on gravel, here is what you need to do:

  1. Mark the four corners where your carport will be installed with a flag or a stake.
  2. Make sure the length of each side is correct.
  3. Make sure that the diagonal distance between two opposite corners is the same as the distance between the other two opposite corners.
  4. Use a level to make sure each side is level. If you only have a bubble level, you can also run a string between the corner stakes to help you make sure each side is completely level and that there aren’t any high or low spots.
  5. Make sure there is at least three feet of clear, level space on every side of the carport for the installation crew to work.
  6. Take at least one photo from each of the four sides to show that the whole area is clear and level. When you take the photos, be sure to stand far enough back so the whole site is included in each photo.

Step 3 – Get Your Carport Installation Scheduled

Once your site is ready, send us the photos of your site. Once we receive these photos (and a copy of your permit, if required), your order will be put in a queue for scheduling.

Haven’t ordered your carport yet? Be sure to submit your order at https://alansfactoryoutlet.com/

Back to top

Build Your Own Metal Garage or Carport With Our 3D Builder

Build your Own Metal Garage or Carport With Our 3D Builder

Customize Now

Chapter 9

While You Wait

Waiting for your carport to be installed can seem like the hardest part of your whole carport buying journey.

This is how the scheduling process works:

  1. You get a permit and prepare the site.
  2. You let us know you are ready for installation.
  3. Your job is put into a queue of orders.
  4. When there are enough orders for a job route to be scheduled in your area, you’ll get a call to let you know which day your carport is scheduled to be installed.

Unfortunately, this means that you won’t know which day your carport will be installed until a few days in advance.

Also, since your installation will be part of a multiple-day route, if the installation crew runs into problems with a building they are installing before yours, they’ll need to call you to push the installation time back. They may even need to reschedule your installation for the next route. Hopefully this inconvenient situation won’t happen to you, but I trust you understand the challenges that the installers sometimes face.

In addition to a normal variability in delivery times, right now several factors can cause additional delays:

  • High lumber prices have led to greater demand for metal carports.
  • Installation crews have been shorthanded.
  • There have been unpredictable supply-chain delays.

In most cases it will take several months for your carport to arrive. On my website’s home page you can find estimated delivery times for your area.

I know it can be frustrating to wait for your carport when you don’t know exactly when it will be delivered. If the wait time for your installation doesn’t work out for you, you can always get a full refund of your deposit. But a little patience will pay off, and soon you’ll have a high-quality carport to protect your vehicles.

Once your carport has been installed, please send me some photos or a video! Every month I give a $250 Amazon gift card to one person who has shared a photo that month, and a $500 gift card for someone who has sent in a video. I’d love to see how your carport looks once it’s installed and put to good use.

Haven’t ordered your carport yet? Be sure to submit your order at https://alansfactoryoutlet.com/

Back to top

Final Thoughts

I hope this guide has been helpful as you research and plan your carport. If you happen to have any questions that I didn’t answer in this guide, give me a call or contact me through my website, and I’ll be glad to help.

I wish you all the best in your carport buying journey!

Thank you,

Alan Bernau Jr.

1-800-488-6903


https://alansfactoryoutlet.com/contact-us/

Back to top

Build Your Own Metal Garage or Carport With Our 3D Builder

Build your Own Metal Garage or Carport With Our 3D Builder

Customize Now

Sorry, we don\’t deliver to the selected zip code.
Your Zip Code helps us provide the exact price for your location as construction specs vary depending on code requirements for each state.

    Search results