Are you dreaming of a comfortable, shaded outdoor space to relax and enjoy the view, no matter the weather? Maybe you’re picturing yourself sipping sweet tea on a warm afternoon, protected from the sun’s glare.
Building a metal roof-covered patio is a fantastic way to make that dream a reality.
In this blog post, you’ll find step-by-step instructions on how to build a metal roof covered patio, make your backyard oasis a reality, and turn that dream into something you can enjoy every day.
Why Add a Metal Roof Over Your Patio
Patios are no longer just concrete slabs; they’re considered extensions of our indoor living space, a place to relax, entertain, and connect with nature. Americans are increasingly embracing this trend.
The NAR, or National Association of Realtors, saw a significant 55% surge in patio demand in 2023, placing patios among the top five most desired home features. A metal roof patio cover elevates this space to a whole new level of comfort and usability.
Adding a roof transforms a simple patio into a true outdoor living space. It provides crucial protection from the elements, allowing you to comfortably enjoy your patio space regardless of sun, rain, or even light snow. Beyond comfort, a well-built covered patio also adds substantial value to your home, making it a wise investment.
Benefits of Metal Roofs Compared to Other Materials
While you can use various building materials for a patio roof, including asphalt shingles or clay tiles, metal offers a compelling combination of benefits.
- Metal roofs are known to last long with minimal maintenance, often 50 years or more.
- They’re exceptionally resilient to extreme weather conditions, including strong winds, heavy rain, hail, and even fire.
- Metal roofing panels are lightweight, putting less stress on the underlying roof structure compared to heavier materials.
- The aesthetic appeal of a corrugated metal roof (or other metal roofing styles) can significantly enhance your home’s curb appeal with a clean, modern look.
How to Build a Metal Roof Covered Patio
This guide breaks down building a metal roof-covered patio into four manageable stages. These stages will cover:
- Planning and site preparation.
- Building the patio frame and foundation.
- Installing the metal roof.
- Adding the finishing touches.
Each stage includes detailed steps and tips for success, covering everything from getting a building permit to installing metal roofing panels and more.
Stage 1: Planning and Preparation—Laying the Groundwork for Success
This section will guide you through all the necessary pre-construction checks and preparations. Failing to plan is planning to fail, so don’t rush this crucial stage.
Step 1. Checking Local Building Codes and Obtaining a Building Permit
Before anything else, check your local building codes to see if building a patio with a metal roof requires a permit—it usually does. If so, contact your licensing office; they’ll need basic patio plans and will outline other requirements.
Skipping the permitting process can lead to fines or forced removal. Approval before construction begins is vital.
Step 2. Creating Detailed Patio Plans and Gathering Your Materials
Design your patio, considering its use and connection to the house. Accurate measurements and detailed plans are essential. These plans should show dimensions, post locations, the roof frame, and the overhang.
Here are some average patio sizes you can use as reference:
| Size | Dimensions | Square Footage |
|---|---|---|
| Small | 12’ x 12’ | 144 square feet |
| Medium | 12’ x 14’ | 164 square feet |
| Large | 18’ x 20’ | 360 square feet |
Source: LandscapingNetwork
Detailed plans are your blueprint for success. You can create them by hand or use computer-aided design (CAD) software—choose the method you’re most comfortable with.
We’ll use a 12′ x 14′ (164 sq ft) patio for our example calculations later in this post.
The detailed plan will help you choose the correct materials and estimate the respective quantities of each.
Here’s a list of typical materials you’ll need:
- Metal roofing panels (corrugated metal roofing is popular).
- Roofing screws (with screws with rubber washers).
- Power tools like a power drill, saw, and sander.
- Pressure-treated lumber or metal posts.
- Galvanized post anchors.
- Clear-drying roof cement.
- Underlayment.
- Concrete mix.
- Fasteners.
- Drip edge.
Step 3. Determining Roof Pitch and Understanding Water Runoff
Roof pitch (the roof’s angle) is vital for water runoff. It’s expressed as “rise over run.” For example, a 4/12 pitch means a 4-inch rise for every 12 inches horizontal.
A steeper pitch sheds water faster, but a lower pitch is easier to build. For a metal roof patio cover, at least 3/12 is recommended for proper drainage.
Pro-Tip: Calculating Roof Area Based on Your Roof Pitch and Overhang
A steeper roof pitch and a more generous roof overhang will require more roofing material. Here’s a simplified example calculation for a 12′-wide x 14′-long patio with a 4/12 pitch gable roof and a 1-foot overhang on all sides.
The following image shows a simplified view of the roof structure. Since it’s a gable food, the run is half the width plus the overhang.
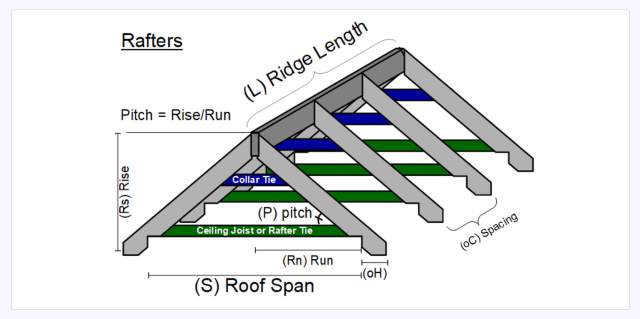
- Calculate the run including the overhang (OH): In our example, we want a 1-foot overhang on all sides, so we add 1’ to half the of the patio’s width to get the total:
(12’ / 2) + 1’ = 7’
- Calculate the rafter length: For a 4/12 pitch, the rafter length is approximately 1.054 times the run (pitch factor). We multiply the adjusted run by the pitch factor:
(7’) * (1.054) = 7.378’
- Calculate the total roof area: Multiply the rafter length by the length of the patio plus the overhang on both sides:
(7.378’) * (14’ + 2’) = 118 square feet
- Multiply that number by two since that is only one side of the roof:
118 x 2 = 236 square feet
Therefore, you’ll need approximately 380 square feet of metal roof panels for a 168-square-foot patio.
Step 4. Cost Considerations for Your Metal Roof Covered Patio
The cost of building a patio with a metal cover varies. Factors influencing the final price include:
- The patio’s size.
- The roofing material.
- The type of foundation.
- Additional amenities.
Fixr.com provides a wide range, from around $590 for a very small, basic patio to over $75,000 for a large, elaborate space with features like an outdoor kitchen.
The trend toward personalized outdoor spaces continues to grow. The NAHB, or National Association of Home Builders, reports that a significant 75% of millennials expressed a desire for an outdoor kitchen in 2024.
Here’s a rough cost breakdown for a 12′ x 14′ patio with a metal roof and a concrete slab foundation:
| Cost Item | Unit Cost | Total Cost |
|---|---|---|
| Foundation1 | $3–$8 per square foot | $492–$1,312 |
| Metal roof2 | $6–$38 per square foot | $984–$6,232 |
| Permit fees2 | $200–$1,400 | $200–$1,400 |
| Labor costs2 | 25% of total project cost | $419–$2,236 |
| Subtotal | — | $2,095–$11,180 |
| Contingency | 10–15% buffer | $210–$1,677 |
| Total | — | $2,305–$12,857 |
These figures are estimates; your actual costs will likely differ. Don’t forget additional expenses like:
- String lights or other lighting options for ambiance.
- Any audio or video equipment you might want.
- Patio furniture.
Step 5. Site Preparation and Safety Considerations
Before any construction begins, thoroughly prepare the site:
- Clear the area of any vegetation, rocks, or other obstructions.
- Level the ground as much as possible to ensure a stable foundation.
- Accurately mark the locations for your post holes using stakes and string, creating a clear visual guide.
Safety is paramount throughout this project.
Remember to wear personal protective equipment and gear, such as safety glasses, gloves, and sturdy work boots. Exercise extreme caution when digging, particularly if there’s any possibility of buried utilities (cable lines).
Stage 2: Building the Patio Frame and a Solid Foundation
A strong, square frame is crucial for a long-lasting patio. This section explains the steps to build one.
Step 1. Setting the Posts: Digging Post Holes and Fixing with Concrete
Each post needs a post hole at least 2 feet deep. Use pressure-treated wood or metal posts. Set posts in concrete, ensuring they’re plumb and level. Use bracing (prop sticks) while the concrete cures. Ensure alignment of posts using galvanized post anchors.
Step 2. Preparing and Pouring the Concrete Slab Foundation
Part of knowing how to build a metal roof covered patio implies knowing how to pour a concrete slab. After setting the posts in concrete, the next step in building a metal roof covered patio is to prepare the area for the concrete slab. To do this, you must:
- Ensure the ground is level and compacted.
- Build a wooden frame to contain the concrete pour.
- Add steel reinforcement mesh for strength.
Finally, you can pour the concrete, level and smooth it, and allow it to cure for the recommended time.
Step 3. Attaching the Beams and Installing the Roof Frame
Attach beams to the patio cover posts using bolts, lag screws, or connectors. Build the roof frame by installing roof joists perpendicular to the beams.

Add bracing as needed, especially for larger roofs or high-wind areas. A strong beam between posts is a must.
Pro-Tip: Using a Triangle of Wood for Bracing
A triangle of wood attached to posts and beams adds significant strength. Use a single framing nail to hold it temporarily, then secure it with screws.
Step 4. Considering Roof Overhang and Outer Edge Design
A roof overhang protects the patio and house from rain. A 1-foot overhang is a good starting point.
Finish the outer edge with fascia boards and optional trim. Make framing adjustments as needed.
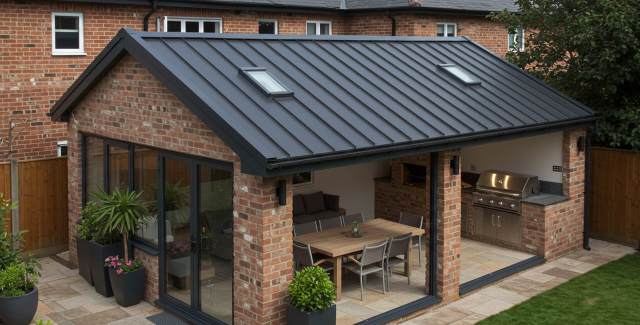
Stage 3: Installing the Metal Roof—Creating a Weatherproof Cover
This is the core of the project – installing the metal roofing. This stage transforms your framed structure into a fully protected outdoor space. Careful and precise installation is crucial to ensure weather resistance and long-term durability.
Step 1. Preparing the Roof Decking (If Necessary)
Whether you need roof decking depends on your metal roofing panels and local codes.
You can install some panels directly over roof joists. Others require decking. If so, explore the different cover roof decking options, including Oriented Strand Board (OSB) and plywood.
Ensure you install it securely, leaving a smooth surface.
Step 2. Installing the Drip Edge and Underlayment
Install a drip edge along the roof edge to direct water away.
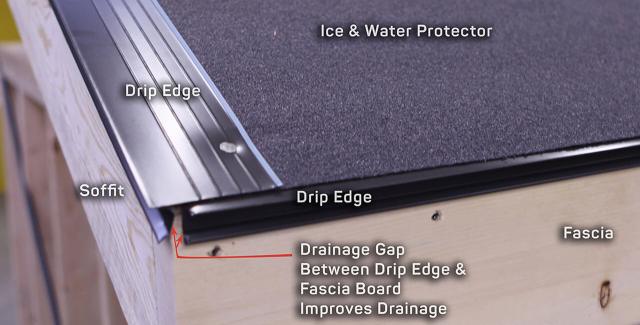
Then, cover the roof with underlayment—felt paper or synthetic—for added moisture protection. Overlap sheets correctly, following the flow of roofing material.
Pro-Tip: Applying Clear-Drying Roof Cement
Apply clear-drying roof cement along underlayment edges and around penetrations for extra leak protection.
Step 3. Laying Out and Fastening the Metal Roof Panels
Start laying out metal roof panels at the bottom, working upwards. Overlap panels precisely per the manufacturer’s instructions. Use roofing screws with rubber washers. Drive them straight and snug, but don’t overtighten. Use decking screws if needed.
Step 4. Installing Ridge Caps and Finishing Touches to the Roof
Install ridge caps along the roof peak for a watertight seal. Add trim or flashing as needed. This completes your finished roof.
Stage 4: Adding the Finishing Touches to the Patio
With the construction complete, it’s time to transform your functional patio into a welcoming and inviting outdoor space. This is where you can infuse your personality and create a cozy atmosphere.
Consider adding modern lighting like string lights for an inviting glow, which is ideal for evening gatherings. Choose furniture that’s comfortable and suits your style and intended use—perhaps a dining set for outdoor meals, a cozy sectional for lounging, or a combination of both.
Potted plants, both large and small, can add a green touch and soften the hard lines of the structure, creating a more natural and relaxing environment. You might also consider adding outdoor rugs, cushions, throws, and other decorative elements to enhance the aesthetic appeal and make the space truly your own.
Maintaining Your Metal Roof Covered Patio
One of the great advantages of a metal roof-covered patio is its relatively low maintenance requirements. However, a little bit of regular care will ensure its longevity and keep it looking its best. Periodically inspect the roof for any loose roofing screws or signs of damage, particularly after severe weather events. Clean the roof surface with a garden hose or a pressure washer (using a low-pressure setting to avoid damaging the finish) to remove dirt, debris, and any accumulated leaves or branches. Address any minor repairs promptly to prevent them from escalating into larger, more costly problems and to avoid a house leak or a leak during thunderstorms.
Enjoy Your New Metal Roof Covered Patio!
Congratulations! You’ve successfully navigated the process and built your own beautiful and functional metal roof covered patio. You’ve completed this exciting project. Now it’s time to step back, admire your handiwork, and, most importantly, enjoy your new outdoor space. You’ve not only added significant value to your home but also created a comfortable and inviting retreat for relaxation, entertaining, and making lasting memories with family and friends.
And here’s a thought…
If you love the idea of a metal roof covered outdoor space but you’re still unsure about how to build a metal roof covered patio, consider one of Alan’s Factory Outlet’s high-quality metal carports! They’re a fantastic alternative with significantly less construction time and effort.
Check out our selection of carports and save yourself some time, sweat, and money in the process!
How to Build a Metal Roof Covered Patio—FAQs
Here are some answers to frequently asked questions:
What if I don’t have much experience doing DIY projects?
This guide is designed for beginners. Basic construction skills are helpful, but careful attention to these steps will make the process manageable. Take your time and double-check your work.
If you’re not ready for a DIY project, you can always purchase one of Alan’s Factory Outlet’s metal carports instead. They come with free delivery and installation.
Can I modify a patio cover plan?
Yes, you can. Standing patio cover plans are often designed to be adaptable. You can certainly modify the dimensions, materials, or design elements to better suit your specific needs and preferences. However, it’s crucially important to ensure that any modifications you make still comply with local building codes.
Can I build a metal roof covered patio with a flat roof?
While you can build a flat roof patio cover, it’s strongly discouraged. Flat roofs are prone to collecting water, which can lead to leaks, water damage, and even structural collapse over time, especially in areas with heavy rainfall or snow.
How can landscape design improve my project?
Landscape design can enhance the beauty, functionality, and overall enjoyment of your patio. Consider adding plants of varying heights and textures to create visual interest and using pathways to connect the patio to other areas of your yard. Even simple landscaping choices can make a big difference in creating a cohesive and inviting outdoor oasis.