Picture this: you’re coming home from work and make a quick stop along the way. You accidentally drop your keys, and your garage door remote control breaks into pieces.
Now what?
If you have an automatic garage door opener, you know how frustrating adding a new remote can be. What remote do you buy? More importantly, how do you program it to work with your opener?
This guide will teach you how to program your garage door opener remote for any major brand in 2025. It’ll also cover choosing the right remote for your opener and some safety considerations before starting.
Save time and eliminate frustration by learning the simple steps to sync your remote and enjoy seamless entry.
How do Garage Door Opener Remotes Work?
Garage door opener remotes work by transmitting a radio frequency (RF) signal to a receiver in the garage door opener unit.
When you press a button on the remote, it sends a coded signal. The opener’s receiver recognizes this signal and activates the motor to open or close the door.
The control sends the signal at a specific frequency—315MHz or 390MHz, for example—to prevent interference. This frequency has to match what the opener can “hear” for the remote to work.
Modern garage openers use rolling codes, encryption, and frequency hopping for increased security. Some more advanced systems include electronic ID tags that trigger proximity sensors to open the garage without pressing a button.
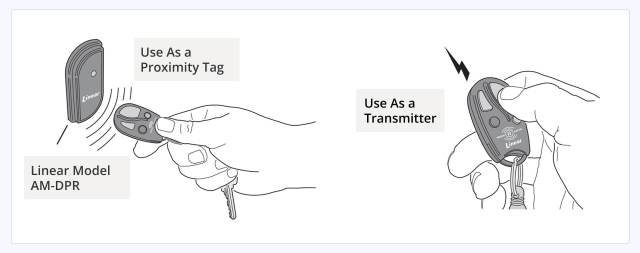
Whichever the case, for the remote to work, you have to pair it with your garage door opener.
How to Choose a Remote Control for Your Garage Door Opener?
There are a few things to consider when choosing a remote control:
- Frequency: To be compatible, you must ensure your new remote works on the same frequency as your garage door opener.
- Technology: Ensure the control has the same security features the opener uses (rolling code, frequency hopping, etc.).
- Type: Select the form factor best suited to your needs (visor clip, keychain fob, wall mount).
- Range: Select a remote with sufficient range for your needs.
Key Safety Considerations Before Programming Your Remote
Programming a garage door remote involves potential risks:
- A moving garage door can cause serious injury if someone is in its path. To prevent accidents, ensure safety features such as IR interruption safety beams are working properly.
- You’ll likely need to access the garage door opener motor, which is typically ceiling-mounted. This implies using a ladder. Ensure the ladder is stable and tall enough to reach comfortably without overextending.
- A garment can get caught in the belt or chain drive and cause an accident.
- You also run the risk of electric shock if you accidentally touch a live wire while programming the garage door opener.
Take these risks and suggestions into account before getting to work.
How to Program a Garage Door Opener Remote—A General Step-by-Step Guide
Programming garage door opener remotes generally involves synchronizing the remote’s code with the opener’s receiver. While specific steps vary by brand, here’s a general guide:
Step 1. Locate and activate the “Learn” button.
Find your garage door opener motor’s “Learn” or “Smart” button. This button is typically in the control panel under the light cover on the back or side of the unit and may be labeled or color-coded.
Press and release it to activate the learning mode. An LED indicator light should turn on. The time window for completing these steps is usually limited. Some models allow you 30 seconds, while others just 15 seconds.
Step 2. Press the remote button.
Press the button on your remote control that you want to program. The garage door opener’s lights may flash, or you may hear a click indicating that it received the signal.
Some openers require you to press the remote button again to confirm the code. There may also be additional steps to exit the learning mode.
Check your opener’s user manual for specific instructions or the brand-specific guides below.
Step 3. Test the Control.
Test the remote by pressing the programmed button inside and outside the garage. Also, test it from inside your car, inside and outside the garage.
It should work as expected.
If it only works in certain places, the signal strength or opener antenna may be the issue.
How to Program Garage Door Opener Remotes—Brand-Specific Step-by-Step Guides
There are over 145,3 million housing units in the US (source: US Census Bureau), and around four out of five units have a garage. That’s over 100 million garage doors out in the wild.
With 66% of newly built single-family homes including a two-car garage and 19% including a three-car garage (source: NAHB Economics), the number of garage doors will only keep growing.
Consequently, the garage door opener market is large and has many players. While the general process of programming a garage door opener remote is similar, specific steps vary by brand.
Here are guides for some popular brands.
How to Program a LiftMaster MAX Garage Door Opener Remote
LiftMaster is one of the most popular garage door opener brands in the US. You can install one for the roll-up garage doors that come standard with Alan’s Factory Outlet’s garages.
The MAX garage door opener remote controls work with all LiftMaster 315 MHz and 390 MHz garage door openers manufactured since 1993. So, this controller will work if you have a LiftMaster garage door opener under 32 years old.

The following step-by-step guide applies to the three LiftMaster remote control models:
- 890MAX three-button mini remote
- 893MAX three-button visor remote
- 895MAX three-button premium remote
Step 1. Check the garage opener’s light bulb.
You’ll need the garage door opener’s light as a programming indicator, so you must ensure it has a working light bulb installed.
Step 2. Locate the “Smart” or “Learn” button in the garage door opener.
Depending on your opener’s model, you’ll find a color-coded button labeled “Smart” or “Learn.” The color can be green, red, orange, purple, or yellow.

The color depends on the year of manufacture, and it indicates the frequency band and security technology it uses.
You’ll have less than a minute to go through all the steps to program each control, so you’ll want to be sure you know where everything is before getting started,
Step 3. Activate the remote control’s program mode.
Locate the remote control’s program button and activate it. The position depends on the particular control’s model. The following image shows you where to find it.
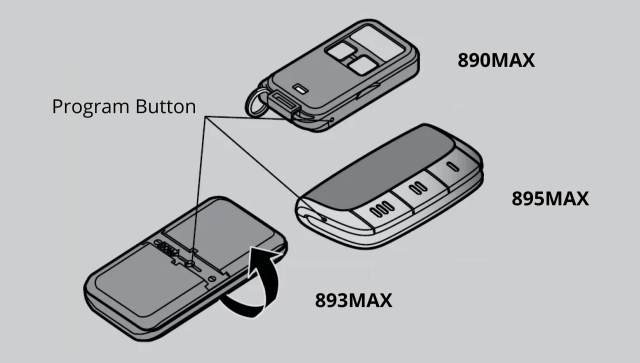
Pressing the button should turn on one or more LED lights to indicate that the programming mode is on.
Once activated, you only have 30 seconds to complete the programming.
Step 4. Press the “Smart” or “Learn” button in the garage door opener.
Once you have activated the programming mode in the control, quickly press the Smart” or “Learn” button in the garage door opener. An LED light should turn on, indicating that the learn mode is activated.
Step 5. Press the button you want to program for the opener once.
Press only one of the three buttons once on either of the MAX control models. That button will control this garage door.
The garage door opener’s light should blink once, indicating that the control has been successfully programmed. If it doesn’t, slowly press and release the same button again and see if the light blinks. Repeat this process until it does.
Once the light blinks, don’t press the button again.
Step 6. Press another button on the control to exit the programming mode.
Once you’ve successfully programmed your control, press and release either of the other two buttons on it.
The small light on the 890MAX or 893MAX, or the backlight on the buttons of the 895MAX model, should turn off, indicating you exited the programming mode.
The control is now ready for use.
How to Program a Garage Door Opener Remote for a Genie Garage Opener
Programming a Genie control remote is a simple three-step process. Each step takes a maximum of 30 seconds to complete.

If, at any point in the process, you see the two LEDs next to the opener’s buttons flash red (a small round one next to a long one), it means you ran out of time and have to start over from step 1.
There’s no need to worry if this happens. You have an unlimited number of tries.
Step 1. Press and hold the program set button.
Press and hold the program set button under the garage door opener until a small round LED light next to it turns blue.
The program set button is the square button next to the two triangular buttons.
The long LED next to it should start blinking purple. This indicates that you’ve entered the opener’s programming mode.
Step 2. In the remote, press the button you want to program.
Quickly press and release the remote control button you’ve chosen to use for this garage door. The long LED light should stop blinking and stay fixed purple.
This tells you the opener successfully received the code from the remote.
Step 3. Press and release the same button on the control again.
To confirm the button you’re programming, you must press and release the same button as before.
The long purple LED should turn off.
Then, both the long and round LEDs should blink blue and turn off.
This indicates your remote is now programmed and ready to use.
How to Program Garage Door Openers With a Ford HomeLink
Ford’s HomeLink system integrates garage door opener controls into your vehicle, providing convenient access without a separate remote. With over 42.4 million Ford vehicles in operation on US roads as of 2024 (source: Ford Authority), knowing how to program HomeLink is essential for many drivers.
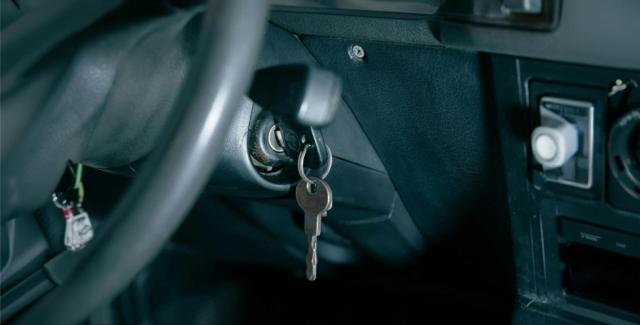
Step 1. Turn the vehicle’s ignition to “ON.”
To program the HomeLink feature, the car’s ignition must be in the “ON” position but without the engine running.
Step 2. Locate the HomeLink buttons.
In most Ford vehicles, you’ll find the three HomeLink buttons on the visor or the overhead console.
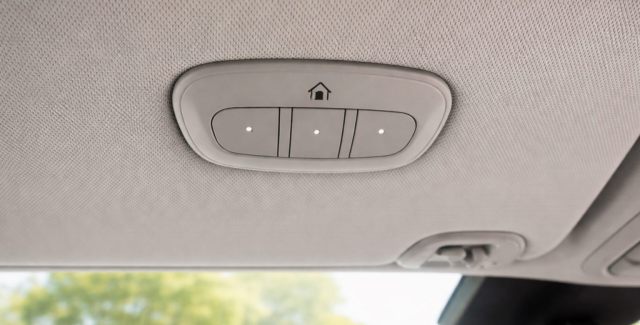
Other times, they’ll be on the bottom of the rearview mirror’s frame.
Choose the button you want to open the garage.
Step 3. Pair an existing remote control to HomeLink
Hold your existing garage door remote one to three inches away from the HomeLink buttons.
Simultaneously press and hold the chosen HomeLink button and your remote’s open button until the LED changes to a fixed light or rapid blink, indicating a successful pairing.
Step 4. Sync your HomeLink system with the garage door opener (optional).
If the HomeLink button doesn’t open and close your garage door, and your garage door opener has a rolling code system, you’ll have to sync it with your opener:
- Locate the program set button on your garage door opener as before (typically labeled “Learn” or “Smart”).
- Press it to start the programming function and quickly return to your vehicle.
- Press the paired HomeLink button for two seconds and release.
- Repeat this process until the garage door opens or closes.
Pro-Tip: Have someone else turn on the opener’s learning mode while you stay in the car so you have enough time to configure the button.
How to Program Garage Door Opener With a Mobile App (WiFi)
Modern garage door openers are a key part of smart home ecosystems, allowing you to control them from your smartphone. With apps like myQ and Aladin Connect, you can open and close your garage door from anywhere, receive notifications when it’s opened or closed, and even view live camera feeds.
This section will show you how to program your garage door opener to open with a mobile app, using myQ as an example.
Before you begin, make sure you have:
- Access to your compatible garage door opener (it should have the myQ logo somewhere).
- A strong WiFi signal in your garage.
- Your WiFi password on hand.
- Your device’s Bluetooth enabled.
Step 1. Download the myQ app.
Jump into the App or Play Store and search for myQ. Download and install the “myQ Garage & Access Control” app. It should have the blue myQ logo.
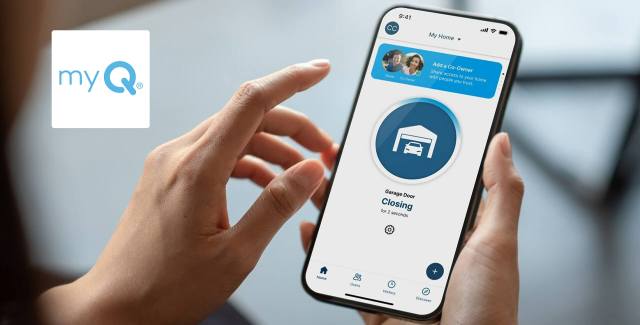
Step 2. Open the myQ app and register for an account.
Follow the on-screen instructions to set up an account in myQ. This step is essential since your devices will be linked to your account.
Step 3. Choose your garage door opener.
You can use myQ to remotely access and control a broad range of devices and accessories from your mobile phone.
For now, just choose “Garage Door Opener” and follow the on-screen instructions to select your particular model.
Step 4. Turn on the WiFi setup mode in your wall control.
To set up your app, you’ll need to turn on the learning mode from your garage door opener’s wall control.
This process varies from model to model, so you must choose the one from the menu that looks most like yours.
Standard wall controls typically have a button labeled “Learn” you just press. In others, you have to navigate through several options on a little digital screen until you find the right option to set up your device:
MENU > PROGRAM > WI-FI SETUP
Once you enter the Learn mode, you should hear a clear “beep” coming from your garage door opener.
Step 5. Grant the app access to the opener’s WiFi network.
The app will automatically begin searching for your compatible garage door opener’s WiFi network to begin the pairing process. Once it finds it, it should be labeled as myQ-XXX.
Select that option, then tap Join when prompted and continue.
Step 6. Pair your WiFi network with the device.
Now you must configure the WiFi network you want the opener to connect to. Choose the right one from the available networks and enter your credentials.
If everything goes smoothly, you should hear three long beeps indicating that the connection worked.
Step 7. Name your garage door.
Give your garage door a name so you know which device you’re controlling. This is particularly useful if you have more than one device configured to work with myQ, like an external gate opener or other smart accessories.
Once you finish this step, you’re done. Try it out by tapping on the large circle in the center of the screen and watch your garage door go.
Troubleshooting Common Remote Control Programming Issues
Learning how to program garage door opener remotes is pretty straightforward. However, even if you follow all the steps to the letter, issues can still arise.
For example, newer garage door opener models may have new security features that require additional steps to set up. To these possible issues, it’s always best to check your owner’s manual for specific remote programming instructions.
However, there are a few common remote programming issues you can identify and troubleshoot yourself. This section shows you how.
Weak Remote Signal
A weak remote signal can prevent successful programming. This often happens due to weak batteries or a blocked/missing antenna on the garage door opener.
- Weak Control Batteries: If the control’s LED light is dim or doesn’t turn on, replace the batteries and try again.
- Garage Door Opener Antenna Issues: Ensure the antenna (wire sticking out of the back of the garage door opener) is straightened and pointing upward for optimal signal reception.
Interference Issues
Interference from other electronic devices can disrupt the signal between your remote and garage door opener. To troubleshoot, try moving other devices away from the garage door opener or reprogramming the remote at different times of the day.
If all else fails and your opener accepts more than one frequency, try changing to a controller that uses a different frequency.
Other Common Programming Issues and How to Solve Them
Other issues you may be having include:
- Incompatible Remote: Verify that your remote is compatible with your garage door opener.
- Incorrect Button Press: Ensure you are pressing the correct buttons in the correct sequence.
- Expired Time Window: Complete each step within the allotted time frame.
- Opener in Lockout Mode: Some openers have a lockout mode that disables remote operation. Check that it’s not activated.
- Rolling Code Issues: If your opener uses rolling codes, follow the specific instructions for your brand and model.
From Frustration to Freedom: Master Your Garage Door’s Remote Control
With a little patience and the right guidance, you can transform the frustration of a malfunctioning remote into the effortless convenience of seamless garage access.
Whether you’re dealing with a classic fixed-code remote, a modern rolling-code system, or even a smart, app-controlled opener, the key is understanding the fundamentals and following the specific steps for your brand. Remember, safety always comes first—ensure your garage door’s safety features are functioning correctly, and use a stable ladder when needed.
If you’re looking for a durable, reliable, and cost-effective garage to house your vehicles and belongings, look no further than Alan’s Factory Outlet. Explore our wide selection of metal garages and find the perfect fit for your needs!
