Meet Billy Ray, an RV owner who’s spent the last few months planning a bucket-list road trip to the Grand Canyon with his family. Departure day arrives, and they excitedly head to the RV only to find that disaster struck while it was sitting idle.
A musty smell hits them first, followed by the sound of a dead engine.

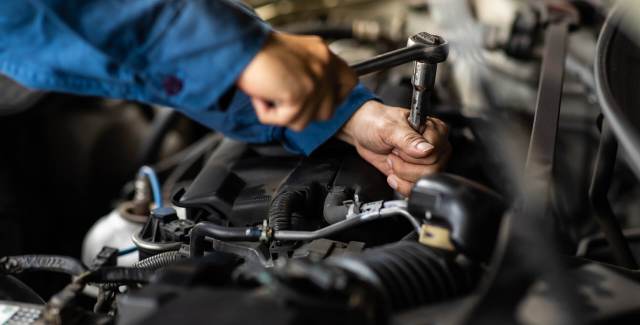
He pops the hood and notices the chewed electrical wires. Suddenly, that dream vacation feels like a nightmare.
Sound dramatic?
Scenarios like this are all too real for RV owners who neglect RV storage.
The good news is that nearly all these problems—pest infestations, dead batteries, ruined tires, water damage, fuel system issues, and more—are entirely avoidable. Protecting your investment and ensuring your RV is ready for adventure comes down to understanding and implementing correct RV storage practices.
If you’re unsure about how to store an RV or want to improve your process, this guide is your one-stop shop. Let’s get started!
Why Storing Your RV Is Necessary
For most RV owners, life isn’t a non-stop road trip. According to the RV Dealers Association (RVDA), Americans used their RVs for an average of 30 days in 2024. That means the average RV spent 335 days, or 92% of the year, parked or in storage.
The most common reason is the off-season, but other situations that also require properly storing RVs may come up, including:
- Home renovations that take up driveway space
- Extended personal travel without the RV
- Temporary local parking restrictions
Beyond those reasons, the RVDA also highlights that almost two-thirds of RVers own more than one unit, with 16% owning four or more (see graph below).

When driving one of multiple RVs you own, the ones you’re not driving need to be stored somewhere.
The question is, where and how do you store an RV the right way?
Exploring Your RV Storage Options
Choosing where to store your RV, especially when traveling without it, is a major decision. You’ll find various storage options, each offering a different balance of cost, convenience, and protection for your recreational vehicle.
Uncovered vs. Covered vs. Indoor Protection
Before considering specific options like storing at home or a facility, it’s helpful to grasp the fundamental difference between the primary levels of protection: uncovered, covered, and indoor storage.
- Uncovered outdoor RV storage is the least secure option, as it is vulnerable to weather, vandalism, and other threats. However, an RV cover offers some protection.
- Covered storage, like an RV carport, shields against sun and precipitation but leaves sides exposed to elements and pests.
- Indoor storage in enclosed buildings like RV garages provides the highest level of protection from all weather, sun, pests, and theft.
This distinction applies whether you’re considering storing on your own property or using a commercial facility. The final decision will depend on the severity of your local weather and the current security conditions.
On-Property Storage Solutions
If you’ve got the space, keeping your RV at home offers maximum convenience and helps you save on monthly fees. There are three common on-property options:
Basic On-Property Storage (Driveway or Yard)
The simplest approach is to park in your driveway or yard. This is essentially uncovered outdoor storage.
Pros
Cons
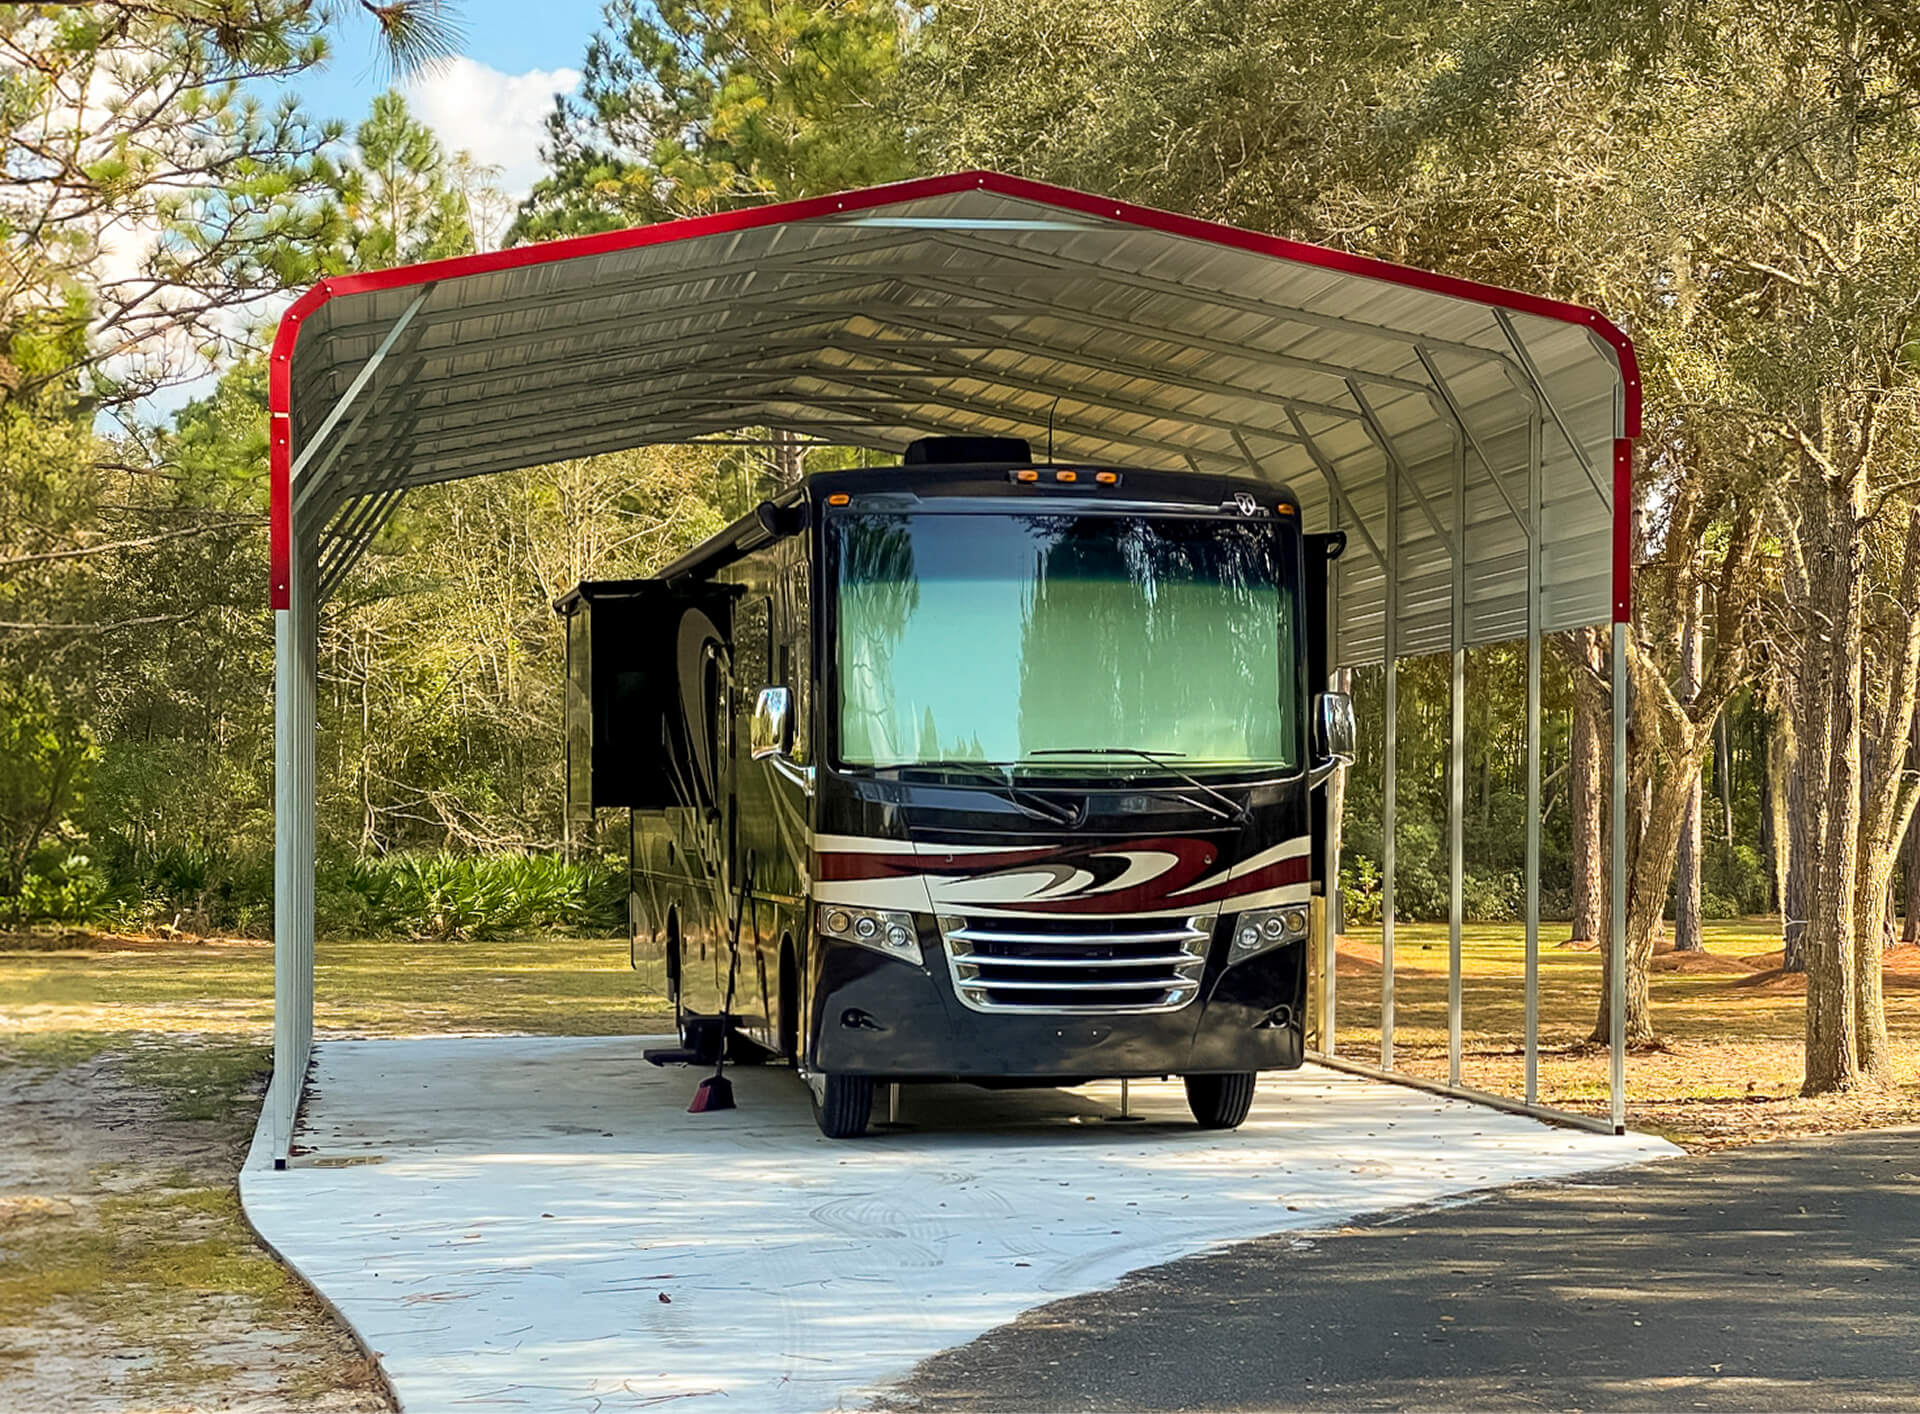
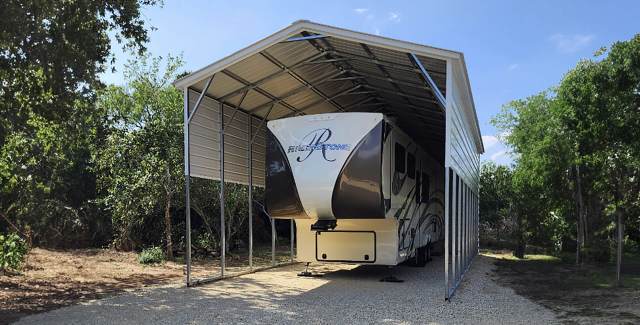
RV Carports (Cost-Effective Covered Protection)
A sturdy RV carport provides a worthwhile upgrade. This structure features a roof, providing effective protection from direct sunlight and precipitation.
Pros
Cons
Investing in a quality metal RV carport specifically sized for your recreational vehicle is a practical choice. A carport is the best option for mild weather if security isn’t an issue.
Alan’s Factory Outlet offers durable, custom metal RV carports that provide reliable covered protection at home at an affordable price.
Dedicated RV Garages or Pole Buildings (Best Indoor Protection)
For the best possible protection on your property, a fully enclosed, dedicated RV garage or a large pole building is ideal. These structures completely shield your RV, but require a higher initial investment.
Pros
Cons
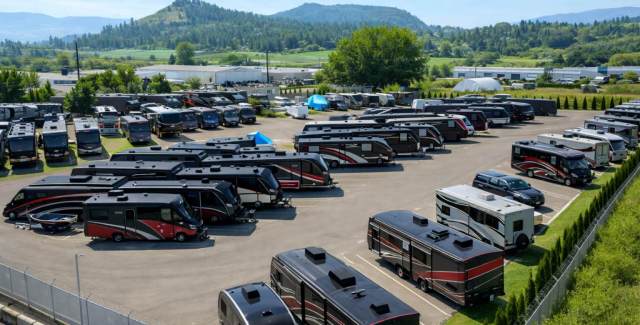
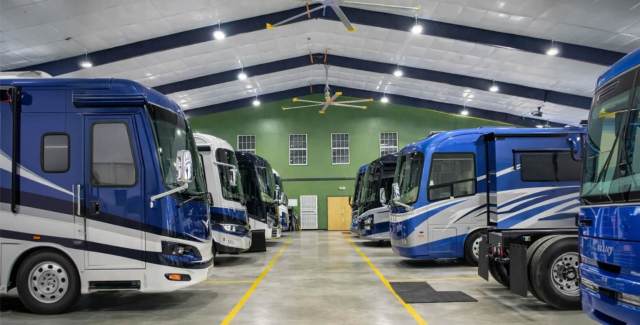
Off-Property Storage Facilities
If home storage isn’t feasible or you simply don’t want your RV taking up space at home for most of the year, commercial facilities offer various options. Just like at home, you’ll find everything from outdoor parking to indoor storage facilities, each with a different price tag.
Here’s a quick overview of how much you can expect to pay for off-property RV storage, according to HomeGuide:
| Storage Option | RV Storage Cost Range |
|---|---|
| Outdoor uncovered storage | $75-$150 |
| Covered storage | $125-$200 |
| Indoor storage | $150-$400+ |
Besides coverage, costs also vary significantly by location, RV size, and included amenities.
Considering your RV will likely spend 11 out of 12 months in storage, you’re looking at an annual storage cost of $825-$4,400. However, you’ll most likely have to pay for the entire 12 months, so the actual annual cost will likely be between $900 and $4,800. As you can see, storage can be a large part of RV ownership costs, something you must consider if you don’t have a place at home to keep your RV.
Outdoor Storage and Uncovered Spaces
This is the most basic and typically cheapest option at a commercial facility. It’s essentially an open parking lot where your RV gets a designated spot.
Pros
Cons
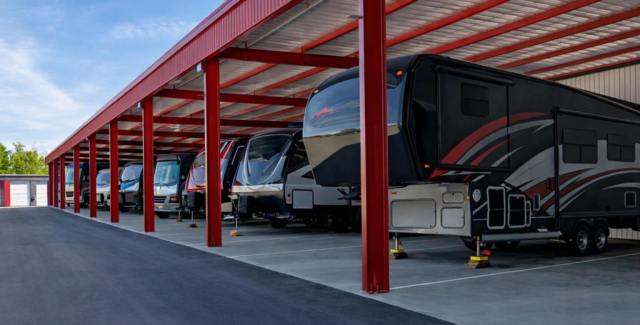
Covered Parking Space (At a Facility)
Similar to a home carport, these are large parking spaces under a roof structure within the facility grounds.
Pros
Cons
Indoor Storage Units (At a Facility)
This offers the highest protection level. Depending on the facility and your budget, your RV is parked inside a large, enclosed building or warehouse space alongside other vehicles, or you can get a dedicated unit.
Pros
Cons
Key Factors to Consider When Choosing Your Storage Location
Selecting the best overall storage solution—whether at home or a facility, outdoor, covered, or indoor—requires weighing several key factors against your specific needs and priorities.
Storage Duration (Long-Term vs. Short-Term)
The storage time impacts the required protection level.
- Short-term RV storage (a couple of months between trips) might allow for more basic protection if the budget is tight, as long-term degradation is less concerning.
- Long-term RV storage (an entire season or over 12 months) makes investing in better protection, such as covered or indoor storage, much more crucial to prevent damage from extended exposure to the elements.
Level of Protection Needed (Climate and Security)
The local climate plays a significant role in determining where and how to store an RV. Assessing your local security risks is also paramount, especially if you’ll be away.
For example, if you’re on the East Coast near Florida and plan to store your RV from June to November (during hurricane season), you’ll want to store it in an RV shelter with proper wind rating conditions.
Most of Alan’s Factory Outlet metal buildings are certified to withstand winds up to 150 mph. Upgraded buildings in places like Florida can be certified to withstand wind speeds of up to 170 mph.
Budget Considerations
As we saw earlier, storage costs must be a constant consideration when you own an RV. There’s no such thing as free storage, even if you park your RV at home.
If you opt for a third-party storage solution, you will incur regular storage fees. While you can avoid these fees by storing it at home (if that’s a possibility), leaving it out in the open can lead to increased maintenance or repair costs. Installing a garage or carport will mean an upfront investment.
You must always balance the cost with the protection offered and your RV’s value. Consider the following:
- Factor in potential repair costs from inadequate storage—sometimes paying more upfront saves money later.
- Compare RV shelter building costs vs. long-term rental fees.
- Get multiple quotes from facilities.
Access Needs and Convenience
Consider how often you’ll need to access the stored RV.
- Verify easy maneuverability for your RV size within the facility.
- Check facility access hours. Ensure they fit your schedule.
- Home storage offers maximum convenience.
- Factor in travel time to the storage location.
RV Storage Tips and Steps to Protect Your Exterior
Once you’ve decided where to store your RV, proper preparation is paramount to prevent damage. Let’s start with essential preventative measures to safeguard the exterior.
Step 1. Wash and Wax
Storing a dirty RV allows grime, bird droppings, and road salt to damage the finish over time.
- Give your RV a thorough top-to-bottom wash using RV-specific soap. Clean the roof, awnings, and slide-out tops carefully.

- After drying completely, apply a quality wax, sealant, or ceramic finish. This creates a protective barrier against sun damage and makes future cleaning easier.
Pro Tip #1. Get a New Paint Job
It may sound counterintuitive to paint your RV right before storing it, but remember, the paint job does more than just make it look nice. It’s the skin that protects the body from rust and other types of damage.
A fresh paint job before prolonged storage, combined with the other tips presented above, ensures your RV’s exterior will be in tip-top shape when you come by to take it out.
Step 2. Inspect and Repair Seals and Roof
Water leaks are a major threat, especially if you’re storing in an uncovered driveway or RV lot. Before storage, meticulously inspect all exterior seams and seals.
- Check around windows, doors, vents, lights, and roof fixtures for any signs of damage. Look for cracked, dried, or missing sealant.
- Touch up any suspect areas with appropriate RV sealant (e.g., lap sealant for roofs and non-sag for vertical surfaces).
- Inspect the roof membrane for tears, punctures, or wear.
These simple steps prevent costly water damage.
Pro Tip #2. Consider an RV Cover
A full RV cover does wonders to protect your paint job (new or not), especially in uncovered spaces. However, it’s also great at keeping dust from settling on the surface when storing RVs inside enclosed garages.
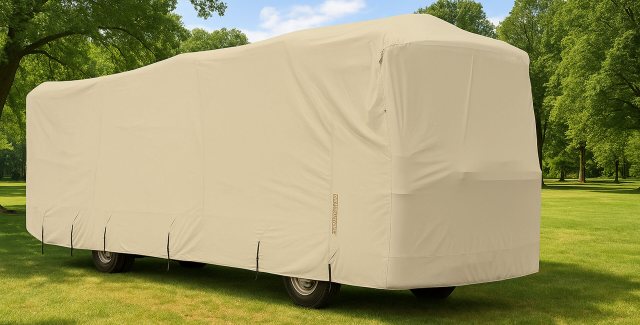
An RV cover shields from UV rays, dirt, and bird droppings. Choose one that is breathable to avoid trapping moisture and the risk of mold in humid environments.
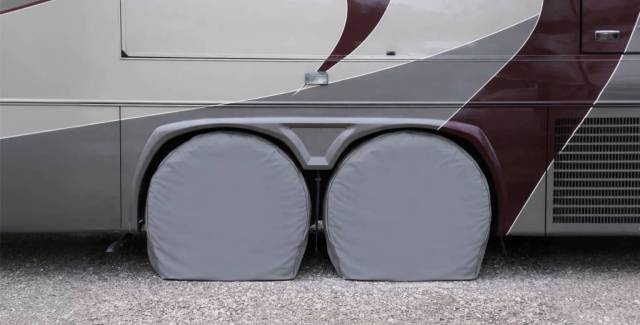
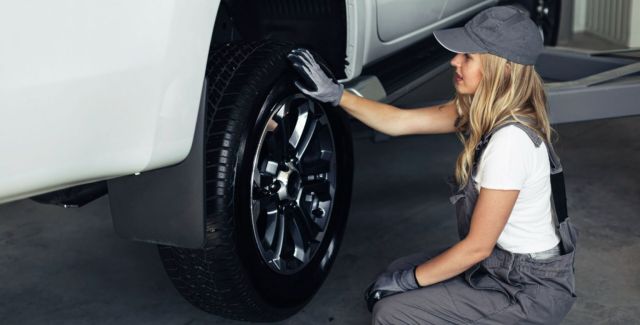
Step 3. Protect Your Tires from UV Damage and Flat Spots
Sunlight degrades rubber, causing cracks and reducing the lifespan of your tires. The oxygen in the air will do the same. Extended exposure is particularly harmful during storage.
Tires also tend to deform and develop flat spots in the rubber if they’re under load in the same position for too long.
To keep your RV’s tires in good shape, no matter how long you store it, follow these tips:
- Inflate the tires slightly above the recommended pressure (an extra five psi is fine) to minimize contact surface and flat spots during short-term storage. Periodically move the RV slightly to change the tires’ contact points with the ground.
- Keep your tires out of direct sunlight and away from heat. You can use a quality tire cover or simply wrap them in a thick, opaque plastic bag. Don’t forget the spare tire!
- For long-term storage, raise the RV on blocks or jack stands to keep the tires completely off the ground.
- Apply a water-based UV protectant dressing (avoid petroleum-based products).
- Inspect tires and check pressure periodically.
- Clean tires thoroughly.
Steps to Prepare Your Recreational Vehicle’s Interior for RV Storage
Prepping the inside is just as vital as the exterior. The goals are:
- Protecting interior furniture and other furnishings from damage
- Preventing pests, mold, mildew, and odors
Follow these steps to protect your RV’s interior during storage.
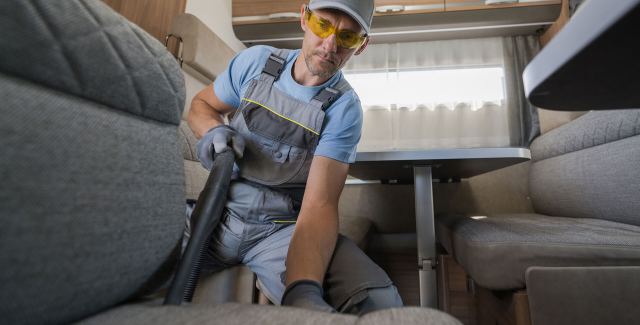
Step 1. Thorough Cleaning and Emptying
Food remnants attract pests and mold, while dirt and grime accumulate on surfaces over time. Before storing your RV, make sure to:
- Clean all surfaces thoroughly, including the stove, microwave, countertops, tables, sinks, toilets, showers, and other frequently used areas.
- Remove all food items—both perishables and non-perishables (check every cabinet and drawer).
- Vacuum or sweep floors, carpets, and upholstery. Clean spills immediately.
- Consider removing valuable electronics or personal camping supplies.
- Remove all trash and recyclables.
Step 2. Defrost and Clean the Refrigerator and Freezer
The fridge requires special attention.
- Clean the interior thoroughly using a mild detergent or a baking soda solution. Wipe dry.
- Turn off and empty completely.
Step 3. Manage Humidity and Odors
A closed RV can get musty, especially in humid areas. To tackle this issue:
- Promote air circulation. If stored under cover or indoors, consider cracking the roof vents slightly (ensure vent covers are installed). Prop open the fridge, interior cabinet doors, and closet doors.
- Use moisture absorbers: (E.g., gel packs, DampRid, desiccants). Place them strategically in sinks, closets, and open areas.
- Use odor absorbers: (E.g., baking soda boxes or cedar blocks). Some people use dryer sheets for freshness.
Step 4. Practice Pest Management
Keeping critters out is essential. Mice and insects can cause serious damage to electrical wires, upholstery, and more.
- Inspect the RV’s exterior and underside for potential entry points. Focus on gaps around pipes, wires, access panels, and seals.
- Seal any small gaps found using appropriate sealant, such as RV silicone. Use pest-block foam cautiously and steel wool only in specific non-electrical spots.
- Use deterrents. Peppermint oil on cotton balls, refreshed periodically, is a popular natural option. You can also choose non-poisonous commercial repellents.
- Most importantly, remove all food sources and scraps as they attract pests. Additionally, please refrain from using poison baits inside the RV.
Preparing All Other Systems for RV Storage
If you don’t want to end up like Billy Ray and Ashley, safeguard your RV’s vital systems—water, waste, fuel, tires, propane, and electrical—before storage. This step is critical to prevent costly damage, especially from freezing.
Step 1. Prepare Water Systems for Storage
If you’re storing during winter, this is the most important preparation step you’ll take. Frozen water expands and can burst water lines, fittings, the water heater, and the water pump.
To avoid these issues:
- Drain all water: Empty the freshwater tank, drain the water heater (i.e., relieve pressure, let it cool, and remove the plug). Open all faucets (hot and cold) and low-point drains, and flush the toilet until the water stops. Ensure waste tanks (gray tanks, black tanks) are empty.
- Bypass the water heater: Engage the heater’s bypass valves to avoid filling its tank with antifreeze.
- Pump RV antifreeze through the lines using the RV’s water pump (via a winterizing kit or siphon) or a hand pump. Open each faucet (starting from the farthest one, then cold, and finally hot) until pure pink fluid flows. Don’t forget the toilet and showers. Also, pour RV antifreeze down drains to protect P-traps from freezing.
- Use ONLY non-toxic pink RV/Marine antifreeze. You’ll typically need around 2–4 gallons.
Storing in hot, humid climates also presents challenges like mold and musty odors. Thoroughly drain the entire system, even if not using antifreeze, to prevent stagnant water.
Step 2. Manage Waste Tanks
Never store an RV with waste in the tanks.
- Completely empty black and gray tanks at a dump station.
- Thoroughly rinse the black tank using a flush connection or tank wand until the water runs clear. Rinse the gray tank, too.
- Close both dump valves securely.
- Optionally add a tank treatment designed for storage.
Step 3. Stabilize the Fuel System
Fuel degrades over time primarily due to oxidation, evaporation, and moisture. This process leads to the formation of gums, varnish, and acids, which can clog fuel lines, corrode components, and ultimately damage your engine or generator.
To avoid this:
- Fill the fuel tank to approximately 95% full to reduce condensation.
- Add the correct amount of a quality fuel stabilizer.
- Run the engine and generator for 5 to 15 minutes to circulate the treated fuel through the entire fuel system (i.e., lines, filters, injectors, and carburetor).
Step 4. Disengage and Protect Propane Systems
Propane is a dangerous fire hazard, especially if you store your RV in an enclosed building like a garage. Ensure you close the service valves tightly on all propane tanks to avoid leaks in the system after long storage periods.
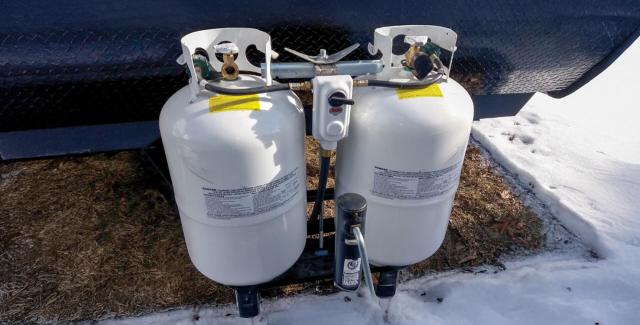
The residual propane in the gas lines doesn’t pose a real risk, but you can burn it off in the gas stove for extra peace of mind.
If you’re storing your RV in a third-party storage facility, check their storage rules. Some facilities require tank removal. If so, you’ll have to leave the propane tank at home. Make sure to store it upright, outdoors, and away from ignition sources.
Step 5. Take Care of Your Battery for Longevity
All batteries age whether you use them or not, but certain things like deep discharges or overcharging can cause premature failure.
For short-term storage:
- Use the battery disconnect switch to cut off the battery from the RV’s circuits.
- If it’s too cold, you may want to remove and store the battery indoors in a dry place that stays above freezing. It’s also important to keep the battery off the concrete floor.
Even if it’s disconnected, an RV battery will self-discharge in long-term storage, so this requires special care:
- Fully charge the RV battery (or batteries), then disconnect and remove it (or them) from the RV.
- Clean the battery and its terminals and store it in a warm, dry place off the ground (i.e., on a shelf)
- Check voltage weekly or monthly to maintain a charge. Recharge the battery if the voltage drops below ~12.4V.
Pro Tip #3. Use a Battery Maintainer or a Multi-Stage Charger
For a hands-off approach, use a battery tender or maintainer for long-term storage. It’ll keep your battery at a healthy state of charge with minimal oversight.
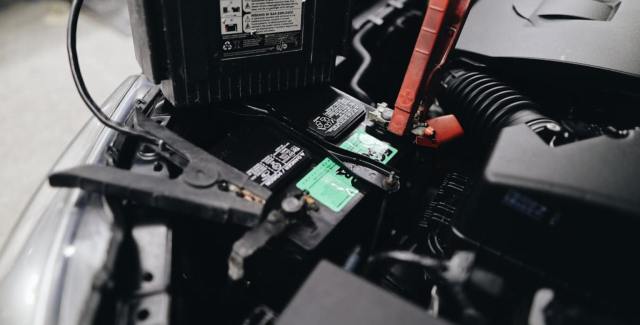
You can also leave the battery connected to the RV if the RV is plugged in via an electrical hookup. In this case, ensure it has a modern multi-stage charger to prevent overcharging, especially if it’s an old battery. Still, check on it periodically.
Final Checks Before Closing Up
One last walk-through before locking up ensures everything is secure.
Step 1. Close Windows and Vents
- Confirm every window is closed, latched, and locked.
- Close all roof vents securely unless using specific vent covers for minimal airflow (only when stored under cover or indoors).
Step 2. Retract Slides and Awnings
- Ensure all slide-outs are fully retracted and sealed against the RV body.
- Fully retract and lock all awnings securely against the RV.
Step 3. Turn Off All Appliances and Breakers
- Verify all lights, fans, and appliances are off.
- Switch off the main 120V AC circuit breaker(s).
- Consider switching off the main 12V DC breaker, unless needed for battery maintenance.
Step 4. Secure the RV
- Lock all entry doors with the deadbolt.
- Lock all exterior storage compartment key access doors.
- Install a hitch lock (for travel trailers) or a kingpin lock (for fifth-wheel trailers) for towables.
RV Storage Preparation Checklist
Use the following checklist for a final review of essential preparation tasks.
Exterior Prep
- Wash and wax the exterior.
- Inspect/repair seals and roof.
- Clean tires and apply UV protectant.
- Cover tires (including spare) to block sunlight.
- (Optional—outdoor storage) Install a breathable RV cover.
- (Optional—long-term storage) Lift the RV onto blocks or jack stands.
Interior Prep
- Remove all food items (perishables and non-perishables).
- Remove all trash.
- Clean all interior surfaces thoroughly.
- Vacuum/sweep floors and upholstery.
- Turn off, empty, clean, and defrost the fridge/freezer.
- Prop fridge/freezer doors open slightly.
- Place moisture absorbers (e.g., DampRid, gel packs) inside.
- Promote air circulation (e.g., prop open cabinets and closets).
- Inspect for and seal potential pest entry points.
- Use non-poisonous pest deterrents (e.g., peppermint oil).
Systems Prep
- Drain the freshwater tank, water heater (remove the plug), and low-point lines.
- Bypass the water heater.
- (Optional—freezing temps) Pump pink RV antifreeze through all lines and faucets.
- (Optional—freezing temps) Pour antifreeze into drains (i.e., P-traps).
- Empty and thoroughly rinse black and gray tanks. Close all valves.
- Fill fuel tank to ~95% capacity, add fuel stabilizer, and run engine/generator briefly.
- Close propane tank service valves securely. Remove tanks if required by the facility or for indoor, enclosed storage.
- Use the battery disconnect switch to disengage the battery for short-term storage.
- (Optional—long-term storage) Fully charge the RV battery pack, then remove, clean, and store indoors (maintain charge manually or use a battery tender).
Final Checks
- Close and lock all windows and vents.
- Retract slides and awnings completely.
- Turn off appliances and main AC/DC breakers, as applicable.
- Lock all doors and compartments. Install the hitch or kingpin lock if applicable.
Choosing the Right RV Storage Facility (If Not Storing On-Property)
If commercial storage is your choice, selecting the right facility involves more than just comparing prices. Consider these factors for optimal care and security.
Security Features to Look For
Prioritize facilities with robust security:
- Perimeter: Strong security fence.
- Access: Controlled gates (e.g., keypad, card).
- Lighting: Good illumination throughout.
- Surveillance: Visible security cameras.
- Staff: Presence of knowledgeable staff or patrols. Is it a secure facility?
Access and Convenience
- Hours: Ensure access times fit your needs.
- Location: Consider travel time from home.
- Maneuverability: Visit to check if there’s ample room to drive and park your RV easily.
Amenities and Services
Look for helpful extras:
- Electrical hookup (for battery tending)
- Climate control (for indoor units)
- Pest control program
- Water access
- Dump station
- Wash bay
Understanding Costs and Contracts
Before signing:
- Clarify Fees: Understand base rent, deposits, admin fees, and insurance costs.
- Read Contract: Review the Rental Agreement carefully—term length, payment rules, late fees, and move-out procedures.
- Insurance: Verify your RV insurance policy covers storage or understand the facility’s requirements and offerings.
Protecting Your RV During Storage
Even with thorough prep, periodic checks during storage are wise.
Periodic Check-Ins
If possible, visit monthly or bi-monthly:
- Walk around. Check for damage, vandalism, and tire pressure.
- Peek inside. Check for leaks, pests, and mold.
- Ensure covers are secure.
Pest Monitoring
- Check traps and deterrents. Refresh repellents (e.g., peppermint oil).
- Look for new signs of intrusion.
Ventilation Check (If Applicable)
- Ensure any intentionally opened vents or cabinets remain clear for air circulation.
Taking Your RV Out of Storage
When it’s time to hit the road again, follow these steps to safely recommission your RV.
De-Winterizing Checklist
If you used antifreeze:
- Flush System: Connect freshwater and run all faucets (hot and cold) until the water is clear and free of antifreeze taste and smell.
- Recommission Water Heater: Reinstall the drain plug, turn bypass valves to normal, and let the tank fill completely before turning on the heat (electric or gas).
- Sanitize System: Highly recommended. Use a bleach solution or RV sanitizer in the freshwater tank, run it through all water lines, let it sit for several hours, then flush thoroughly until the water is clear.
System Checks
- Tires: Inflate all tires (including spare) to the correct pressure. Inspect for damage.
- Battery: Reinstall fully charged RV battery (if removed), clean terminals, and check connections.
- Propane: Slowly open tank valves and check for leaks with soapy water. Test all appliances.
- Engine/Generator: Check fluid levels and start and run both to ensure proper operation.
- Appliances: Test all AC and DC appliances and systems for proper function.
Exterior and Interior Inspection
- Wash Exterior: Clean off storage dust and grime.
- Inspect: Do another check of the roof, seals, and siding.
- Air Out: Open windows and vents to freshen the interior.
- Final Pest Check: Look for any signs of critters that moved in.
- Filters: Clean or replace air conditioner filters.
Safety First Checks
CRITICAL before your first trip:
- Detectors: Test smoke, CO, and LP gas detectors. Replace batteries and expired units.
- Fire Extinguisher: Check gauge and ensure accessibility.
- Lights: Verify all running lights, brake lights, and turn signals work correctly.
The Value of RVing (And Protecting Your Investment)
Understanding the importance of proper RV storage is amplified by the current enthusiasm for the RV lifestyle.
The RV Industry Association forecasts robust sales, potentially reaching 350,000 new units in 2025. At the same time, analysts like Bish forecast industry growth trends of 8-9% this year. This means more Americans are embracing RV ownership than ever before.
A key driver is value; RV travel is often more economical than conventional methods. Go RVing estimates savings of $1,500 for a family trip from Springfield, Missouri, to Rocky Mountain National Park via RV compared to flying and renting a car.
As this investment grows in popularity, informed storage decisions are crucial for protecting these valuable assets.
Store It Right, Enjoy the Ride
Taking the time to store your RV properly is vital to responsible ownership. It’s an essential preventative measure that protects one of your most significant investments from weather, pests, and neglect.
Diligent RV storage ensures your RV remains reliable and ready to create memories, making you a happy camper whenever adventure calls.
Whether you choose to store your RV on your property or opt for a space at a secure local storage facility, consistently following the preparation steps outlined above is key. However, a sturdy, reliable storage building like Alan’s Factory Outlet metal carports and garages will give you extra peace of mind.
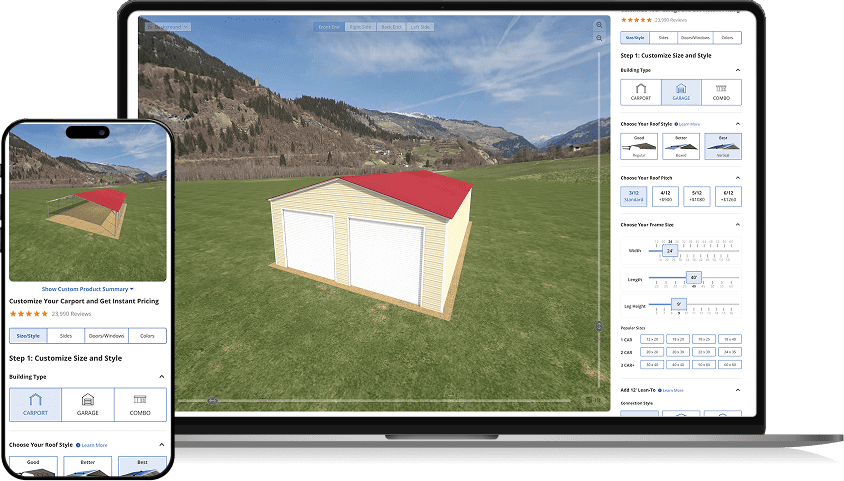
At Alan’s Factory Outlet, we specialize in high-quality, affordable custom metal RV carports, garages, and custom metal buildings that make RV storage easy. Try our 3D Builder and design a custom RV carport or garage for your RV today.