
More often than not, garages aren’t just for parking cars and storage. Many people, especially business owners and hobbyists, use their garage as an at-home workshop. However, it may be hard to picture setting one up yourself.
Fortunately, you can design your garage workshop space in many ways for productivity and privacy. From floor plans to must-have accessories, we’ve compiled an in-depth list of ideas to customize the ultimate garage workshop.
Workshop Design Ideas
Designs and styles can make a workshop stand out from the rest. Take your workshop to the next level with these unique garage design ideas.
1. Creative Theme
Consider your favorite sports team, TV show, or hobby. You can theme your workshop with nostalgic collector’s items, posters, or colored tile designs.
2. Polished Flooring

Polishing your garage workshop flooring will give it a glossy finish and also helps increase its resistance to damage and stains.
3. Recessed Walls
Also known as “wall niches,” recessed walls can be useful for storage. Add built-in shelves into them to display things like trophies or collectors’ items.
4. Colored Details
Add a pop of color, such as painting the walls a bright hue. Doing so can help liven up a plain interior.
5. Exposed Beam Ceiling
Who said ceilings have to be flat and bare? If your garage has a pitched roof style or high ceilings, consider installing (or exposing) the beams to switch up the look.
6. Skylight Windows

Skylight windows are another option for changing the ceiling look. Install these windows to bring in a lot of natural light for your workshop.
7. Enclosed Office
Are you using your garage workshop for business? Consider enclosing a section with a wall to create an office space for administrative tasks.
8. Lounge Area
Add a designated lounge area—such as a couch, TV, and reading material—in your workshop, where you take breaks and relax.
9. Garage Bump-out
If you still plan to use your garage for parking, you could extend the garage or “bump out” the wall to construct a workshop space.
10. Shop Lights
Bright and lightweight, shop light fixtures come in various lengths and are popular for garage workshops. Opt for LED shop lights for energy efficiency.
11. Custom Cabinetry
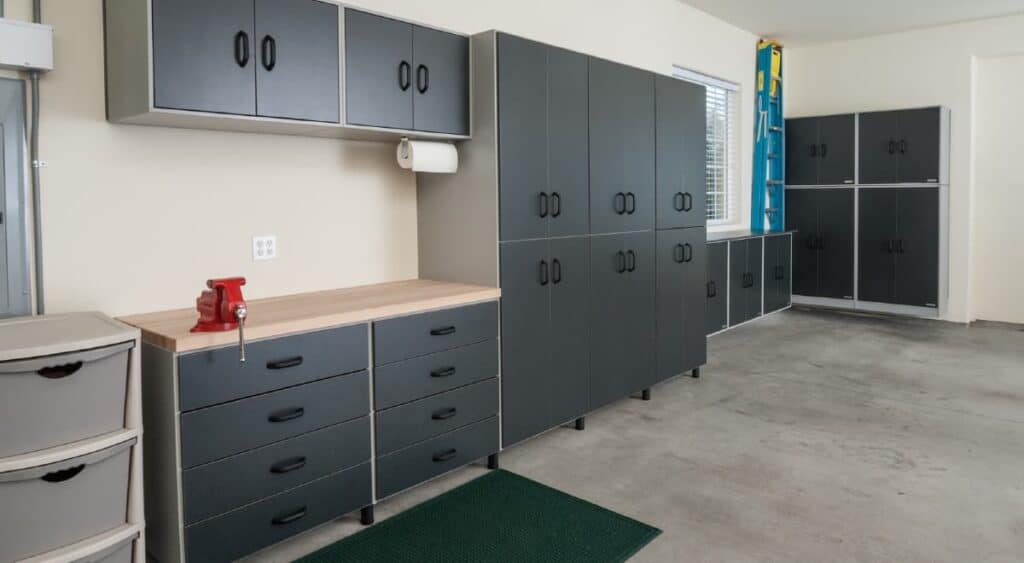
Unlike stock cabinets, custom-designed cabinetry should fit your space. This option is great if your workshop has irregular shapes and corners.
12. Awning Windows
Opening outward, awning windows can help with garage ventilation while also blocking rain from entering when open.
13. Loft Style
For a garage with high ceilings, take advantage of the vertical space. Install a second floor or “loft” as a lounge area, extra storage space, and more.
14. Convenient Kitchenette
Need a space to take lunch breaks? Use a corner of the workshop to set up a kitchenette—mini-fridge, microwave, cupboards, sink—to keep snacks and drinks.
Garage Workbench Ideas
From woodworking to DIY projects, having a designated work area can help you remain focused and productive. Check out these garage workbench ideas for inspiration.
15. Garden/Potting Bench
Do you enjoy gardening? Add a potting bench to store your pots, soil mix, and gardening supplies.
16. Mobile Bench
Add wheels to make your workbench mobile. This convenient option lets you move from one place to the next.
17. Foldaway
Do you have a small workshop space? Install a foldable workbench into the wall to close when not in use.
18. Drop-Leaf
Another foldable option, use a drop-leaf workbench style to extend table space when needed. Simply fold the sides back down when not in use to save space.
19. Adjustable-Height
Avoid work fatigue with an adjustable-height table. Raise the bench to work while standing and easily lower it to sit.
20. Flip-Top
A major storage saver, use a flip-top workbench to store away your tools beneath once you’ve completed your project. This style keeps your gadgets and tools all in one place.
21. DIY Wood Panel
If you’re a woodworker or are up for DIY projects, consider building your own workbench using panels. This way, you can customize the size and design to your liking.
22. Collapsible
For another portable option, invest in a collapsible workbench. This style folds into itself, allowing you to take it wherever you need.
23. Built-in Table Saw
Looking for other space-saving options? Build a table saw right into your garage workbench.
24. Wall-Mounted
With a wall-mounted workbench, you’ll have additional space beneath it for storage. This under-table area is ideal for bins, tools, drawers, and more.
Workshop Organization Ideas
No matter the size, a poorly arranged garage can easily become cluttered. Here are a few garage hacks to maximize storage space and keep your workshop well-organized.
25. Wall Racks

Wall-mounted racks can help free up ground space. Use these shelves to keep tools and smaller items at eye level.
26. Storage Bins
Use large bins to keep multiple items in one place. You can categorize your storage bins, such as by equipment type, to keep track of them.
27. Cabinet Space
Cabinets are versatile in placement–you can install them at both eye level and along the floor. Cabinets provide convenient storage space, and they can add style to your workshop.
28. Utility Hooks
For heavier tools and equipment, hang them on utility hooks. This type of hook, especially heavy-duty styles, can generally hold up to 50 lbs.
29. Tool Drawers
Use drawers to keep your tools organized and all in one place. Drawers make it easy to arrange items by size, color, use, and more.
30. Overhead Storage

Take advantage of vertical space by mounting shelves, hooks, or pulleys to the ceiling. This overhead storage area is great for large, long items such as kayaks that take up too much floor space.
31. Shelving Unit
Easily stack storage bins and other equipment with a shelving unit. Many of these units are customizable, allowing you to adjust the shelves as needed.
32. Bike Racks
As for bike storage, racks have versatile options. Bike racks come in various sizes and can mount to floors, walls, and ceilings.
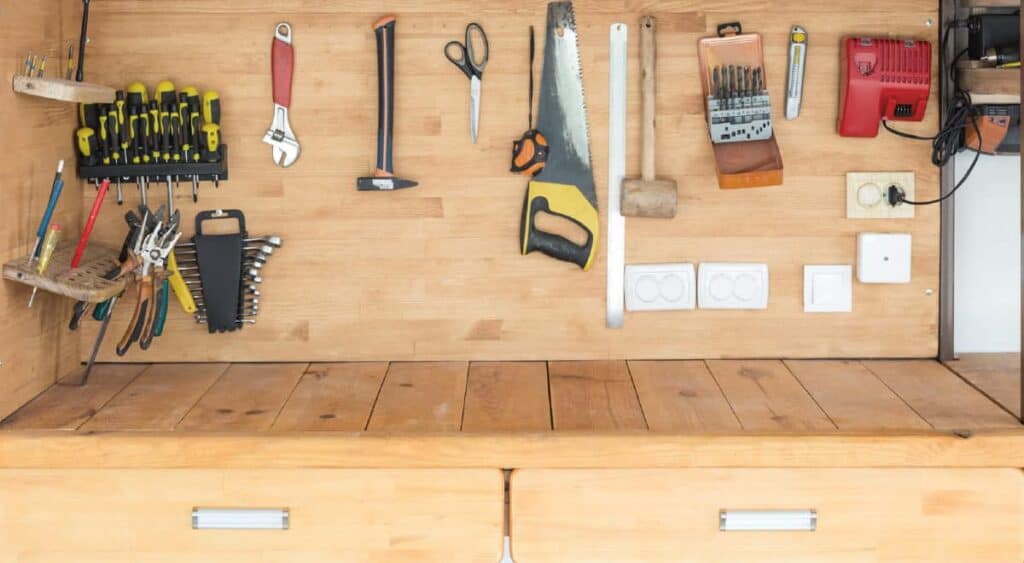
33. Pegboards
With predrilled holes, pegboards are ideal storing solutions for tools and office supplies. Mount a pegboard to the wall to keep small items organized and in plain sight.
34. Utility Cart
Portable and convenient, utility carts function as smaller shelving units on wheels. Use them to place commonly used tools and items.
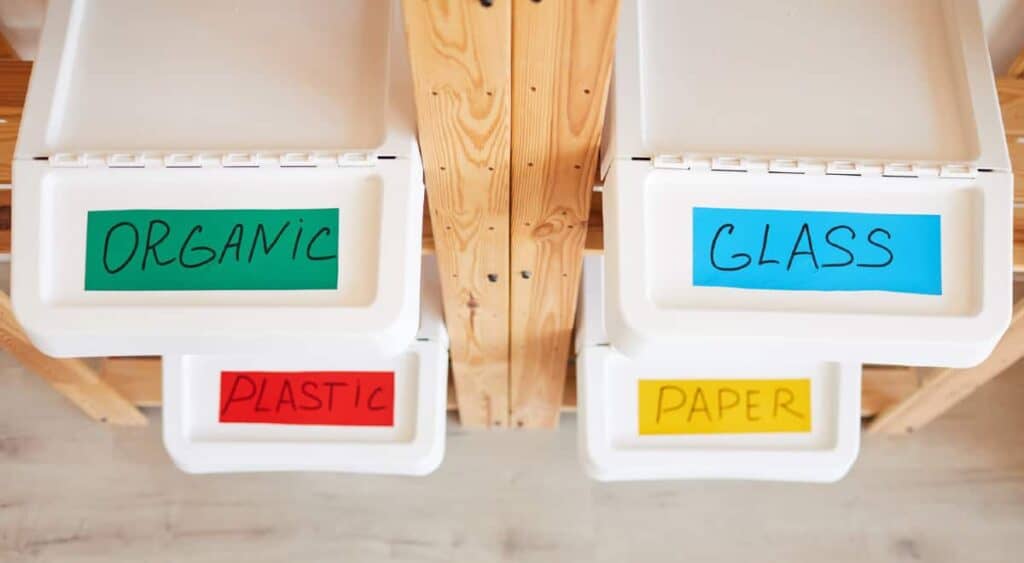
35. Bin Labels
What’s a cool garage workshop without an eye-catching garage door? Draw inspiration for a new garage door with these ideas.
36. Automatic
Simplify entering and exiting the garage by upgrading to an automatic garage door. Automatic doors will cost more than traditional, but the advantage is increased security.
37. Glass Doors
For a more upscale look, consider glass garage doors for your workshop. The glass will also allow in more natural light for the space.
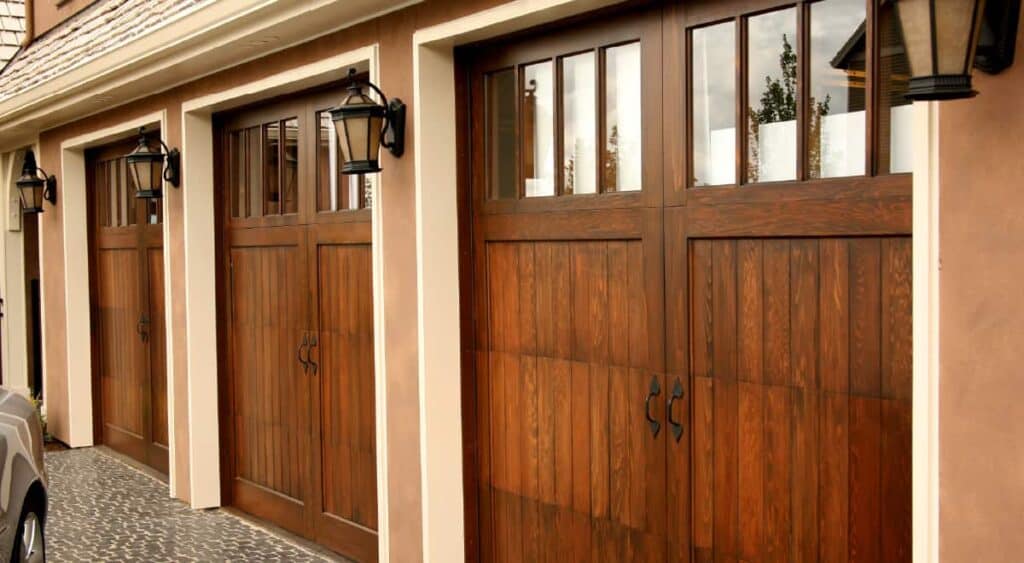
38. Carriage-Style
A change from the general roller garage door, carriage-style doors open outward. Since this door type swings out, you’ll have more usable space in your ceiling area.
39. Tilt-Up Door
Another modern door style is the tilt-up door. Lifting upward and out, this single-panel door will give your garage workshop a unique, sleek exterior.
40. French-Style
Consider French-style doors for a rustic exterior look. These doors also swing out like general entry doors, making your workshop look less like a garage.
41. Door Accents
The door exteriors don’t have to be plain. Customize them with accents like mounted lanterns, metal handles, plants, and more to match your home.
42. Textured Surface
You can add shutters, molding, raised panels, patterns, and more to liven up the exterior. Surround garage doors with siding, beams, and plants.
43. Color Contrast
Paint the garage door with a pop of color to stand out from darker or neutral siding. This will draw more attention to the door design.
44. Exterior Lighting
Install recessed lighting and uplights to create a well-lit space. These light styles will enhance the view while maintaining a clean, minimalist look.
Garage Workshop Plans
Need layout ideas for your specific garage size? Take advantage of our free garage workshop plans below.
45. Small Workshop Layout
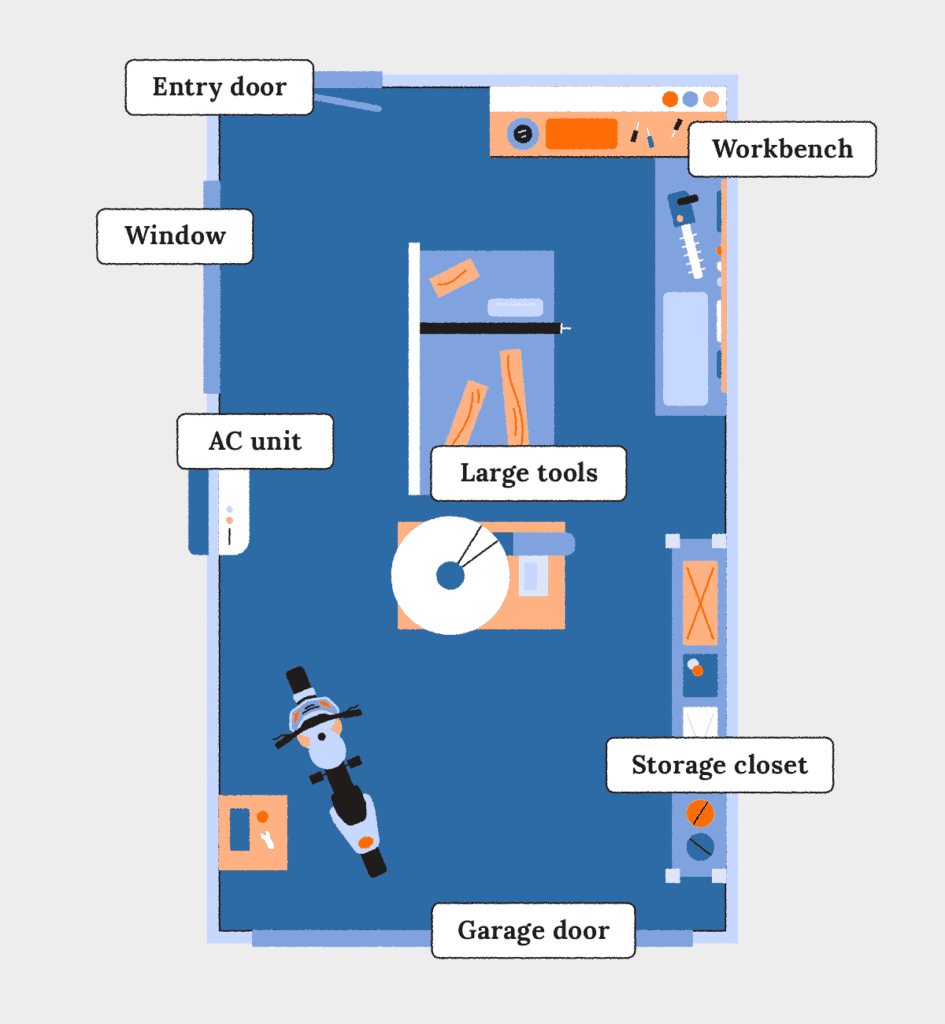
Organization is key for smaller, detached garages. Take advantage of walls and storage closets to maximize space.
46. Two-Car Garage Workshop
With a two-car garage, one side can serve as your workshop while maintaining a parking spot. You can erect a wall between the spaces to keep the areas separated.
47. Natural Light Floor Plan

Windows and glass doors are ideal choices for natural lighting. The right open floor arrangement will also allow natural light to permeate.
48. Three-Car Garage with Workspace
Three-car garages are spacious enough to add a workshop area and get creative with the layout. You can add a bathroom, kitchenette, and more.
Garage Must-Haves for a Workshop
The perfect garage workshop is about design as well as comfort. Consider adding the following must-haves to your space.
49. Adequate Lighting
For visibility and safety, you will need lots of garage lighting. Shop lights and wraparound lights are popular fixtures in workshops, as well as workbench lights for late-evening projects.
50. Proper Ventilation
It’s important to maintain good ventilation in your garage, especially when working with chemicals. Windows, fans, and even open doors can promote fresh airflow.
51. Climate Control Units
In addition to ventilation, you’ll want to control the temperature levels inside your workshop. Air conditioners can keep the garage cool and comfortable, as well as help prevent mold and mildew.
52. Good Insulation
Equally important to climate control is adequate garage insulation. Without this, the cool air can escape, and hot air can enter.
53. Security Features
If you have valuable tools and furniture in your workshop, garage security features will be useful. Popular features include an alarm system, camera installation, and motion sensor lighting.
54. Floor Mats
If you’ll be standing for long periods, rubber floor mats will add cushion and comfort on otherwise hard concrete. Mats also help absorb sound.
55. Utility Sink
Utility sinks are convenient if you’ll need to frequently wash hands and clean up after projects. Install one in your garage for quick water access to wash cars and rinse tools.
56. Mini-Fridge
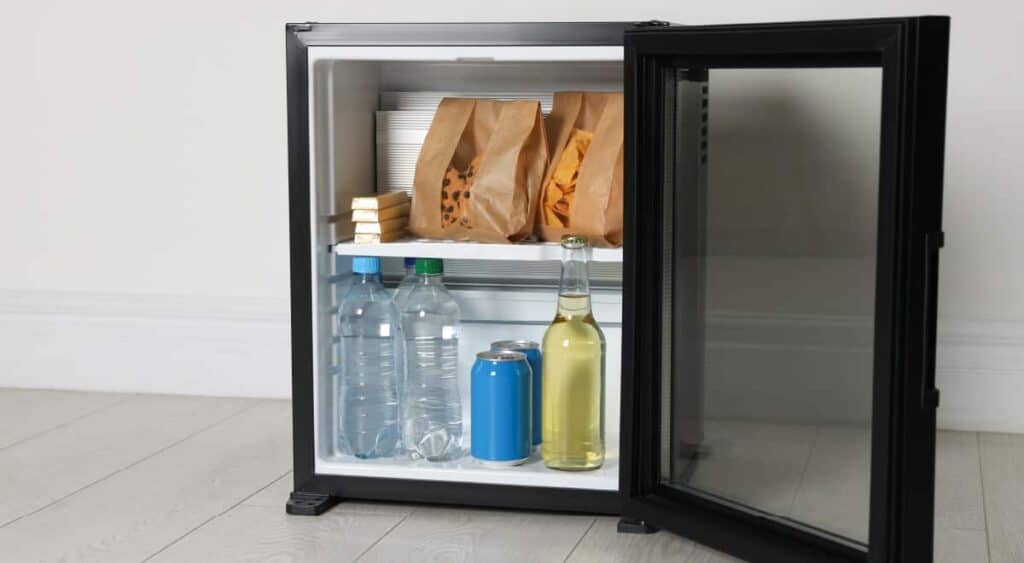
Keep a mini-fridge in your garage to have snacks and drinks within reach. Mini-fridges can fit almost anywhere and are easy to move.
57. Garage Door Opener
Add more convenience to an automatic garage door with a remote control opener. This accessory is useful for multiple people who need access to your garage workshop at different times.
58. Charging Station
Set up a charging station to keep phones, tools, and other electronics powered up when stored away. From mounted shelves to designated drawers, you can use any storage unit to organize the powered items.
59. Fire Extinguisher
Don’t forget about garage safety. It’s always good to store a fire extinguisher nearby, as well as install fire and carbon monoxide alarms for emergencies.
60. Weatherproof Garage Door
Even with insulation, rain and other weather elements can still find their way inside your garage through cracks and holes. For extra protection, you can weatherproof your garage door with a threshold seal, door sweep, and vinyl weather stripping.
61. Storage Sections
Depending on your garage size and type of workshop, you may need multiple storage options throughout the space. Consider creating different storage sections—one for tools, one for cleaning supplies, etc.—to keep your garage organized.
62. First Aid Kit

Last, it’s always good to have a first aid kit handy. Store a kit in a cabinet or drawer for easy access when needed.
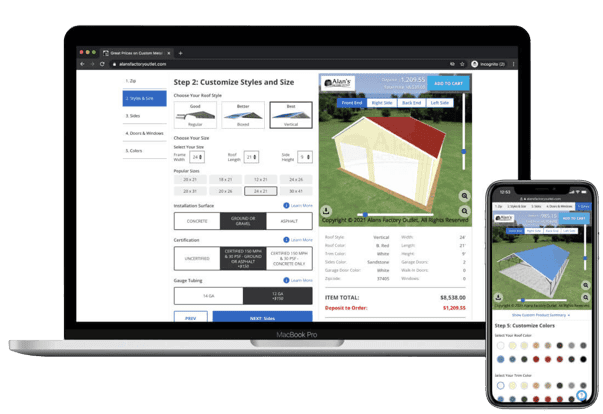
Custom Design Your Next Dream Garage
Now that you have plenty of ideas, it’s time to bring your garage workshop vision to life. If your attached garage has limited space or is hard to modify, use a detached garage for your workshop instead. Durable and quick to install, our prefab metal garages are the perfect home addition.
Easily customize and order your next garage using our 3D tool below.